Ever since Cricut has burst onto the scene, it has made the lives of people so much easier than before in terms of their creativity. It has also helped raise the creativity levels of people to the next level and that is how people should be treating their work. With Cricut, things have been at an all-time high. Even something as insignificant as a flower has immense worth due to Cricut. They might not be real flowers but as long as they’re flowers then you’re good to go. Today, the focus of our topic will be how to make roses with Cricut.
The best part of making roses through Cricut is that you can make them according to any type, size, and color. Even though they might not be real roses but hey, it’s the effort that counts, right? Cricut flowers can be used to enhance anything. The 3D flowers can be added to shadow boxes, cards, presents, signs, your wall, and many other things. With Cricut, the process of making roses is extremely easy. All it requires you to do is to follow a number of steps and once you’re done with them, you’ll be on the end of some amazing roses.
Steps Of How To Make Roses With Cricut
Step – 1: Cutting Out a Cricut Rose
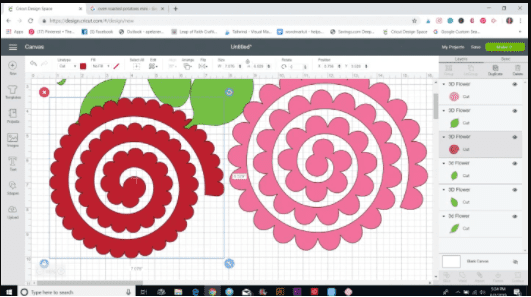
The first thing you’ll want to do is bring in the flower files to Cricut Design Space. I used two different rose files from the Cricut flower cartridge: Flower Shoppe.
The red one is #M4431D and the pink one below is #M3D7E1. They just have slightly different rounded petals. (Make sure you type in the # in the image search bar).

You can open this file in Cricut Design Space then you can resize the corner with the double arrow or typing a size in the toolbar at the top. Once you’re done selecting, click “Make it” and set your material setting to cardstock 80 pounds. Place the cardstock on the regular grip mat, load it onto the machine and then click on the go button whenever prompted.
Step – 2: Preparing the Cricut Rose
In the next step, to get the petals to show off a little more you can use the blossom ball tool where you flip the cardstock over and rub the ball in a half-circle motion on the backside of each petal. If you want the edges of the petals to have a slightly different color, use a dabber to apply some stamp ink to the very edges. You can add a lot or a little, totally up to you!
Step – 3: Rolling Up Cricut 3D Flowers
Place the very edge of the end of the spiral into the quilling tool. After this, you’re going to hold your finger on the cardstock and tool while you roll the cardstock towards you so that it wraps around itself. Wrap about 1/4 of the cardstock around itself and then remove the tool. Place a finger on the top and the bottom of the flower to hold it together and keep turning it with your other fingers until the entire spiral is rolled up.
The last flap is at the bottom of the flower. Before gluing it in, flip the flower and let it go in your hand. This will release the structure and make the petals loosen up a bit. Turn it back over and apply glue to the flap or the spiral, push it down, and hold it in place for 10 seconds or so to secure the bottom. Gently push out the petals with your fingers to add a more realistic look.
Voila! You’ve finally made yourself a 3D Cricut rose. It might take a few flowers to get used to making these but once you get the hang of it, you’ll be making these followers in just a few minutes.

