ACRAFTYLATINA

  • Home
  • Special Projects
    • Weddings
      • Wedding Table Numbers
      • DIY Wedding Invitations with your Cricut
      • Wedding DIY Countdown Sign โ€“ ?? Until I Do
      • Wedding Planning Checklist
      • Abide by Second Wedding Etiquette; Says Who?
      • I Do in Las Vegas
      • Easy Cricut Wedding Projects
    • Sublimation
      • Sublimation to Expand Your Crafting Experience
    • Holidays & Seasonal
      • Make Dad’s Day Special With Your Cricut
      • Create Layers with Contour in Cricut Design Space
      • Fun Projects for Valentine’s Day
      • Home Decor for the Holidays
      • Custom 3-layer Christmas Ornament in Cricut Design Space
      • Christmas Countdown with Cricut
      • Freebies for your Holiday Decor with Cricut
      • Fun 4th of July Decor with Cricut
      • Mother’s Day Card With Your Cricut Joy
      • Motherโ€™s Day Flower Shadow Box
      • Happy Spring Wreath Floral Display
      • Good Fortune This Valentineโ€™s Day
      • Let Cricut Help Color Your Valentine
      • Love Mason Jar
      • Cricut-made Christmas Dish Towels
      • Personalized Christmas Stockings with Cricut
      • Santaโ€™s Milk & Cookies Plate
      • Ornament in Memory of a Loved One
      • Glitzy Holiday Gift Tags
  • Everything Cricut
    • Donโ€™t Be Afraid of Your Cricut, Itโ€™s Friendly
    • How to Use the Cricut Offset Feature
    • Top 10 Tips for Cricut Design Space
    • Drawing with Infusible Ink Pens & Markers
    • Create Custom Stickers Using Your Cricut
    • Back to School
    • Cricut Infusible Ink – What it is and How to Use It
    • Make Beautiful Flowers with Cricut Design Space
    • Family Birthdays Knockout Design
    • Unbox & Setup the New Cricut Joy
    • Write With Your Cricut
    • Upload Fonts To Use In Cricut Design Space
    • Mini but Mighty EasyPress
    • Uploading Your Image from PC to Design Space
    • How To Use Print Then Cut in Cricut Design Space?
    • How to Use Weld in Design Space
    • How to use Cricutโ€™s Design Space Slice Feature
  • Video Tutorials
  • Favorite Crafting Supplies
  • Meet Arlene
  • Contact Me
  • Resource Library

Custom 3-layer Christmas Ornament in Cricut Design Space

Holidays & Seasonal

10 Dec
Christmas ornament hanging on a table with wrapped presents

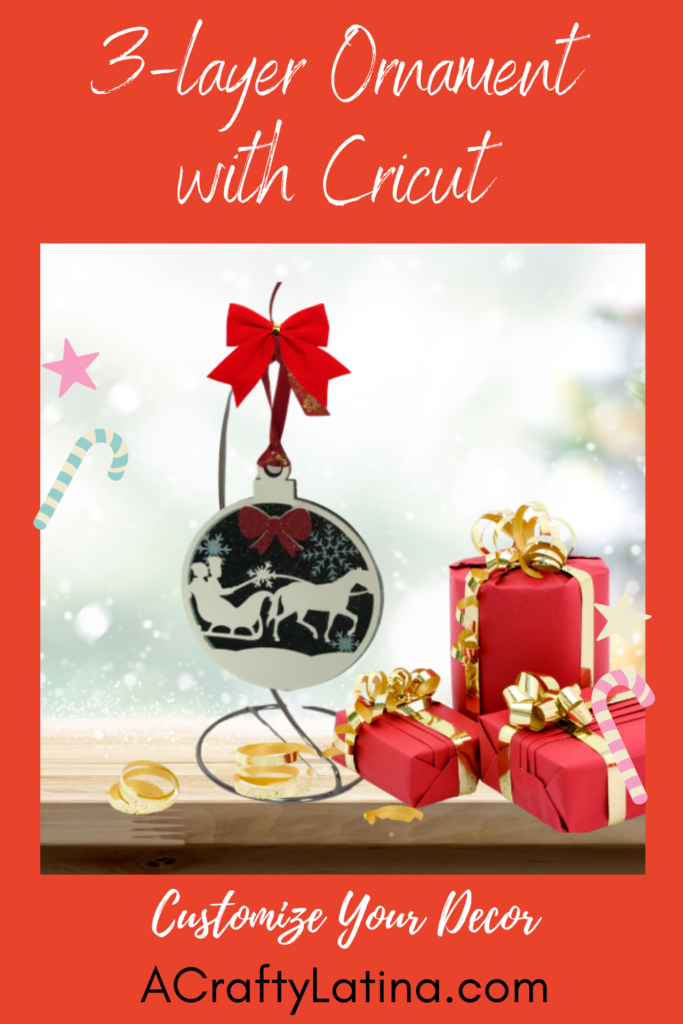
I’m so excited to be able to share this project with you. It’s a little more involved than others, but the payoff is great. I want you to be able to create your own custom designs and this is a good way to learn some new techniques; so let’s create a custom 3-layer Christmas ornament in Cricut Design Space.

View the full tutorial video below and remember to visit the Resource Library for the files. Join below.

Click to Join Resource Library

Supplies Needed

  • Cricut Machine
  • Cutting Mat
  • Cardstock/Glitter Cardstock – I used black glitter for the back; blue glitter for the middle and white 110 lb. cardstock for the front layer. I also used red glitter cardstock for the red bow
  • Design Space (all shapes and images used are found in Design Space)
  • 3D glue dots
Cricut Access Premium memberhsip link

Create Your Ornament Base

Go into shapes and create 2 circles. Make 1 of the circles at least .4″ smaller than the other. Bring them together and align both vertically and horizontally. Once centered, use the slice tool to cut out the circle. Keep only the open circle. That is going to be your base to create your custom 3-layer Christmas ornament in Cricut Design Space.

3 circle shapes showing a cut out in one of the circles

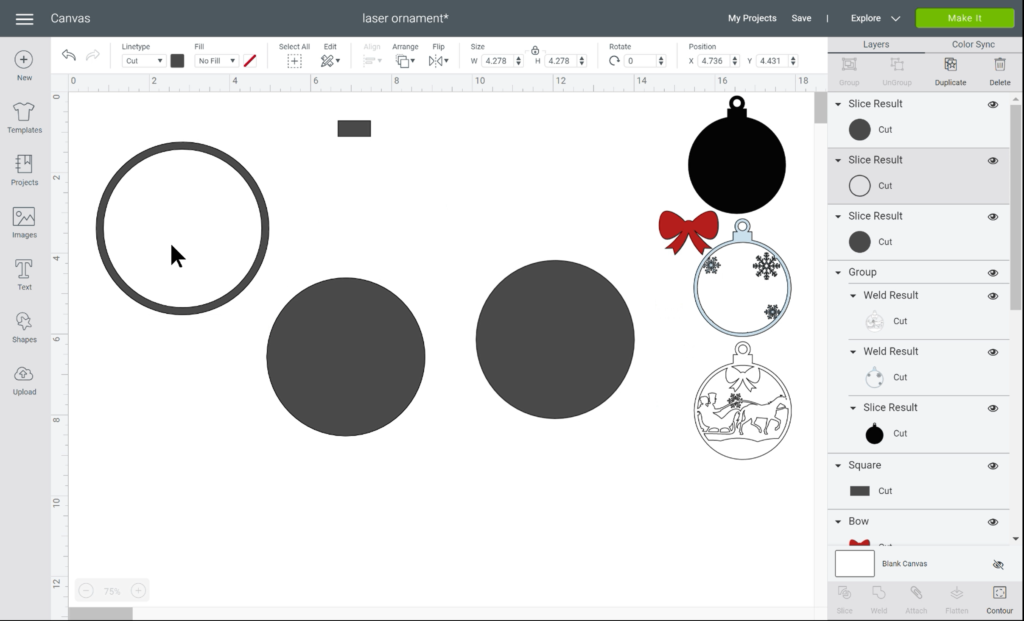
To finish building the ornament base, get a square from the shapes tab and unlock it. Size it to a small rectangle and place at the top of your ornament. Make sure to align horizontally at the top. Go ahead and hit the weld key.

Then get 2 circles and follow the same process as above. But this time, make the smaller circle .5″ smaller than the bigger one. Use the slice feature and resize the open circle to the size you need for the top of the ornament. This is where you will be putting your ribbon or string through.

Make sure to place at the top of the rectangle, align and weld. Duplicate the ornament base so that you have a total of 4 copies.

You now have the base for your custom 3-layer Christmas ornament in Cricut Design Space.

final ornament base with rectangle and ribbon circle attached

Find Your Images

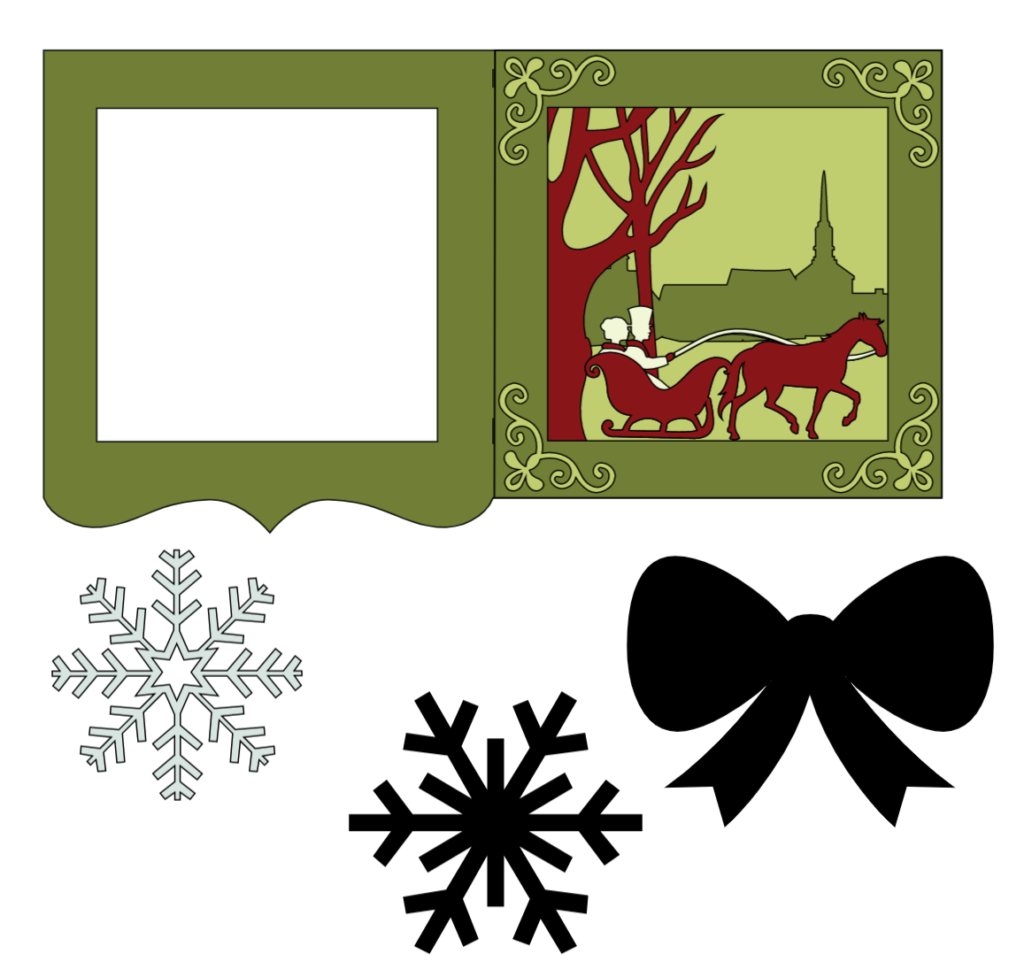
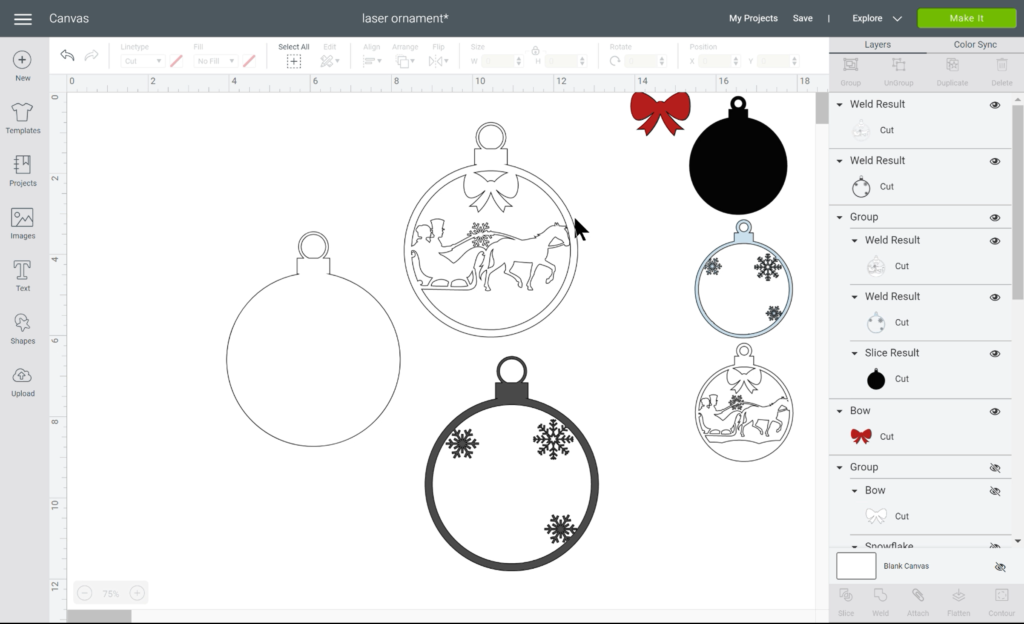
You can use images that already exist in Cricut Design Space for this design. Of course, I encourage you to be as creative as you want to be and create your own designs. Here are the 4 images I used.

The horse and carriage was actually an image from a card; I deleted everything and just kept the silhouette of the horse and carriage.

TIP: Make sure to watch the video below for full details.

4 images used to design the ornament

Design Your Layers

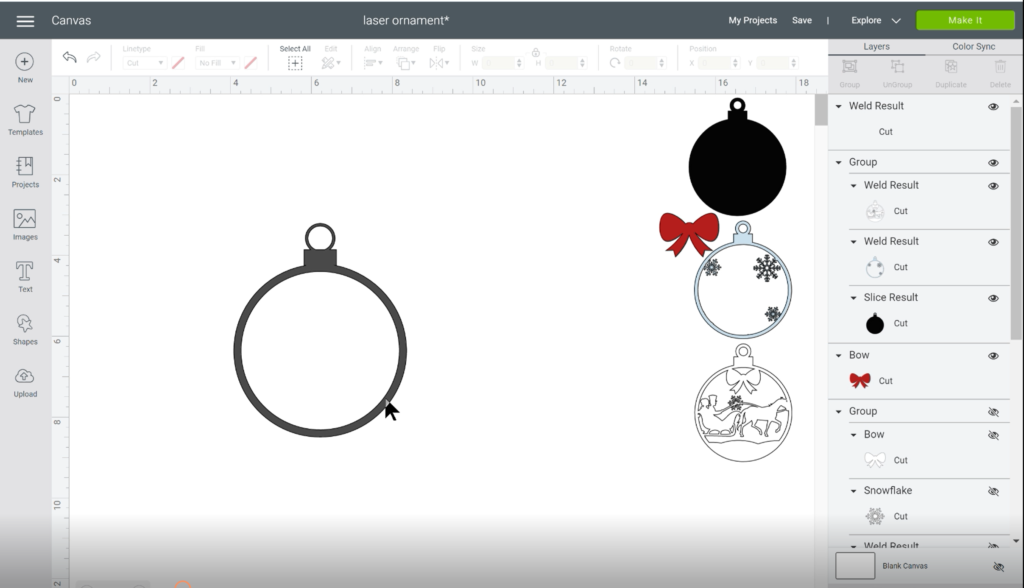
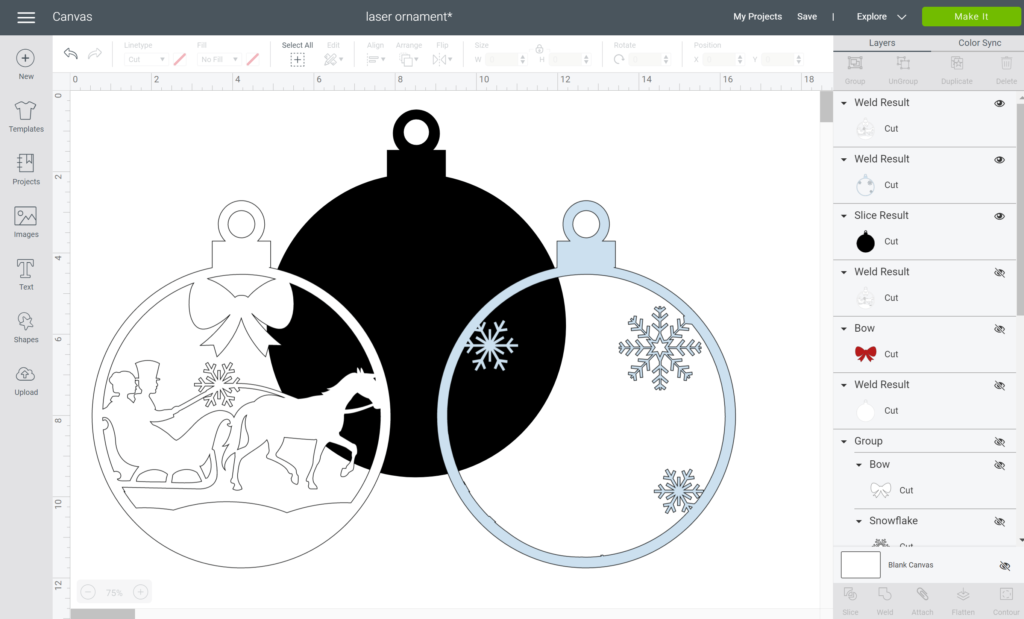
Take one of your copies of the base layer and hit the contour button. Click on the center of the image and X out of contour. That should make your image a solid black color.

showing the contour feature to make back layer a solid color

Set that one aside and get another base shape. Now for the middle layer, resize your snowflakes and put them on the corners like the picture below. It is important that the snowflake edges touch the border of your circle.

Once you have the 3 snowflakes on your shape, highlight everything together and hit weld. We’re halfway there to creating your custom 3-layer Christmas ornament in Cricut Design Space.

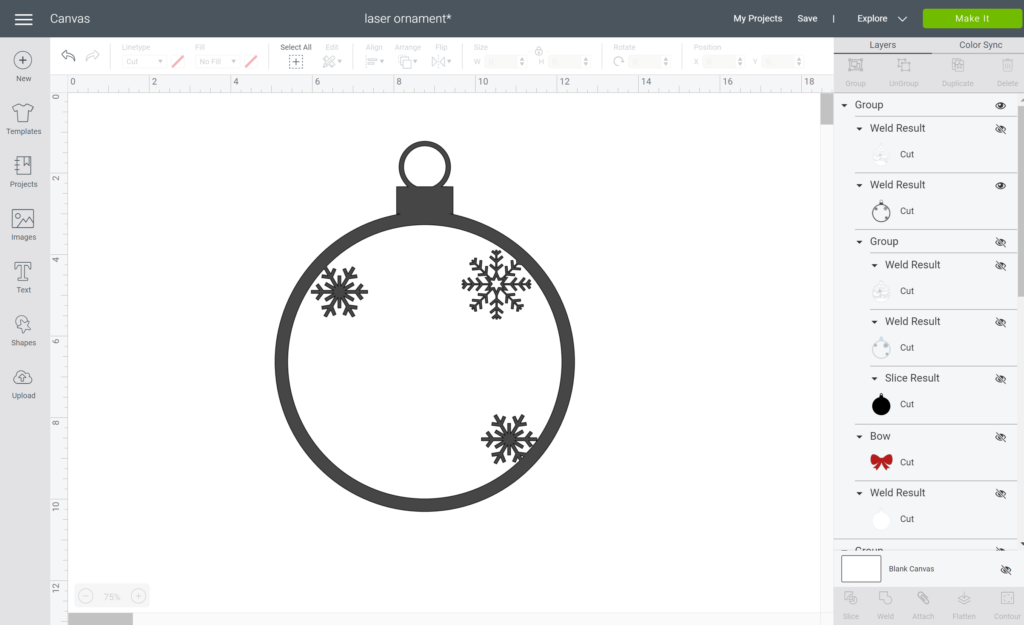
The third layer is the horse and carriage. Grab another ornament base and place your horse and carriage within the circle. Make sure the carriage and horse’s head touch the edges so that you can weld it together. I added a little snowflake on the reins as well.

I then resized the bow and aligned it to the center of the top of the horse and carriage layer. Once you have everything aligned where you want it, highlight everytying and hit weld.

Tip: Place the snowflake layer behind the horse and carriage layer to make sure the snowflakes are visible in the back.

Time for a Snow Mound

So now that all of your 3 layers are done. Let’s make the snow for the bottom of the horse and carriage layer. Since I couldn’t find an image in Design Space, I made my own. Take 3 circles, unlock them and elongate them. I layered them on top of one another and made the middle bump stand taller than the other 2. Once ready, weld them together.

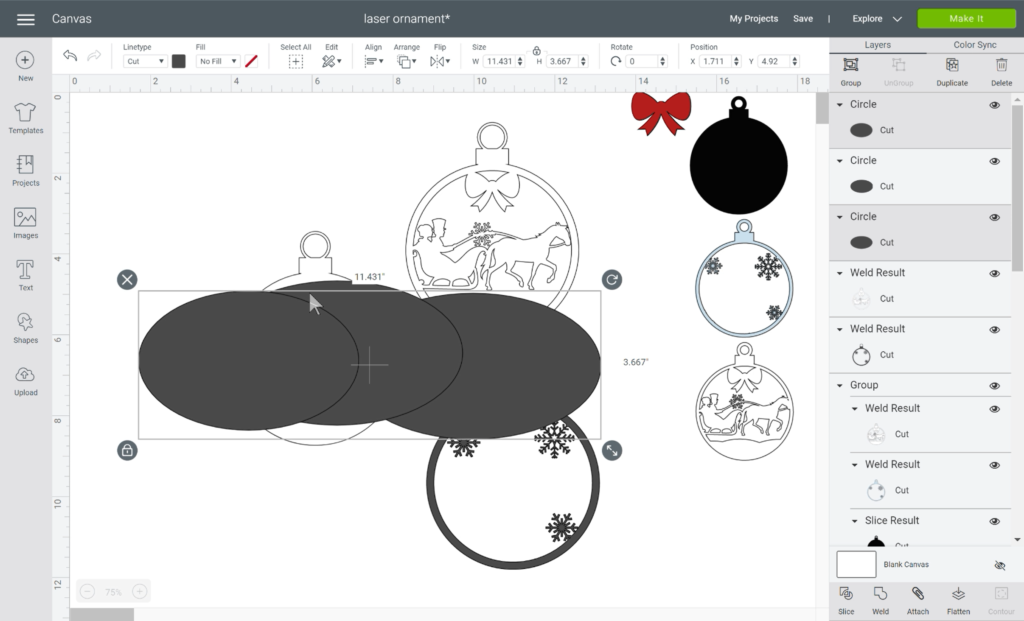
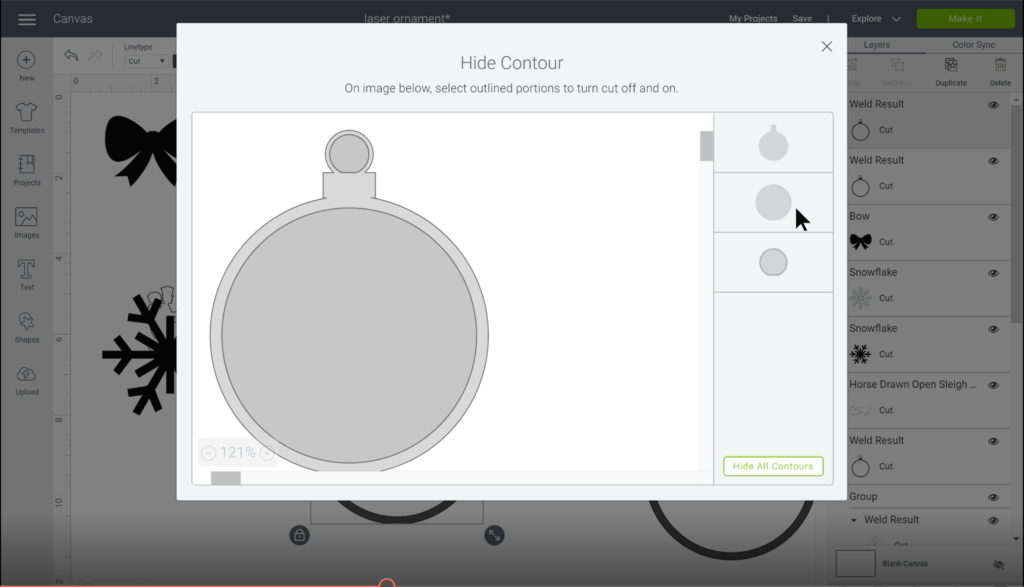
Take your last copy of your ornament base and place the snow mound at the bottom where you want it. Once it looks good, hit the slice button. Remove all of the excess areas.

When you remove the excess you may see that the mound did not slice all the way through. Take another circle, place it within the area of the mound you want and slice it out again.

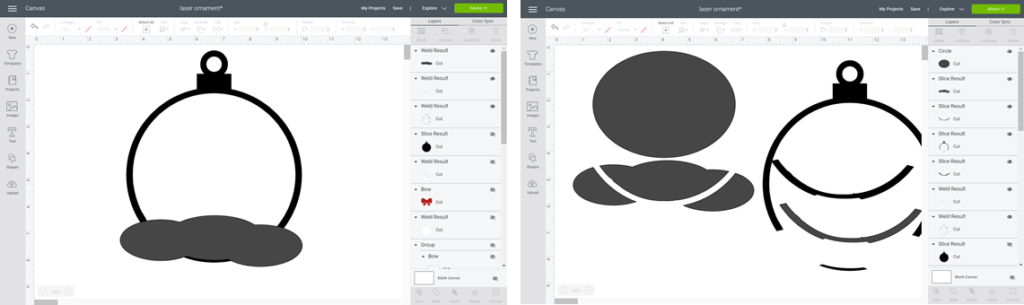
Place your mound at the bottom of the horse and carriage layer and weld it in place. It is now time to assemble your custom 3-layer Christmas ornament in Cricut Design Space.


Time for Assembly

Now that all of your layers are complete you can assemble it. I used 3d squares in between the layers and on the bow. Make sure to watch the full process below.

I know this project had A LOT OF STEPS, but I hope you enjoyed it and try it. It really is so much fun to be able to create your own ornaments. ENJOY!

Related Articles:

Wedding Planning Checklist

Glitzy Holiday Gift Tags

This post may contain affiliate links which may provide me with a small percentage of purchased items. This does not affect the price of your product but does allow me to continue to provide you great content and free resources.

Tweet
Share
Pin2
Share
2 Shares

Subscribe

Sign up for the latest news and updates

Previous Post: « Christmas Countdown with Cricut
Next Post: Home Decor for the Holidays »

Primary Sidebar

Let’s Connect

  • Email
  • Facebook
  • Instagram
  • Pinterest
  • YouTube

Meet Arlene

Welcome to ACraftyLatina! My name is Arlene Gonzรกlez-Pagรกn and my passion is helping others. Read Moreโ€ฆ

Latest on Instagram


Celebrated my bday this weekend and started with t
Celebrated my bday this weekend and started with the best affirmation and attitude #psiloveme #acraftylatina #cricutmade #htv #birthdayweekend

Happy Motherโ€™s Day! May you have a beautiful day
Happy Motherโ€™s Day! May you have a beautiful day surrounded by love ๐Ÿ’— #mothersday #momlife #momsofinstagram #acraftylatina

Getting ready for #mothersday #momgifts #cricutmad
Getting ready for #mothersday #momgifts #cricutmade #makeitwithmichaels #diycrafts #acraftylatina

Fun Easter projects; blog link in bio #acraftylati
Fun Easter projects; blog link in bio #acraftylatina.com #diycrafts #coloring #eastercrafts #craftingismytherapy #cricutmade #acraftylatina #easter

TGIF my friends! Make the most of your day and rem
TGIF my friends! Make the most of your day and remember, your uniqueness is your greatest asset. ๐Ÿฅฐ #beyou #youruniquestyle #confidence #tgif #acraftylatina

Happy 1st day of Spring. A season of new beginnin
Happy 1st day of Spring.  A season of new beginnings ๐Ÿฆ‹ #springisintheair #firstdayofspring #newbeginnings #acraftylatina


Follow on Instagram


Subscribe

Sign up for latest news and updates

Browse by Category

  • Cricut
  • Everything Cricut
  • Special Events
    • Holidays & Seasonal
    • Weddings
  • Sublimation
Celebrated my bday this weekend and started with t Celebrated my bday this weekend and started with the best affirmation and attitude #psiloveme #acraftylatina #cricutmade #htv #birthdayweekend
Happy Motherโ€™s Day! May you have a beautiful day Happy Motherโ€™s Day! May you have a beautiful day surrounded by love ๐Ÿ’— #mothersday #momlife #momsofinstagram #acraftylatina
Getting ready for #mothersday #momgifts #cricutmad Getting ready for #mothersday #momgifts #cricutmade #makeitwithmichaels #diycrafts #acraftylatina
Fun Easter projects; blog link in bio #acraftylati Fun Easter projects; blog link in bio #acraftylatina.com #diycrafts #coloring #eastercrafts #craftingismytherapy #cricutmade #acraftylatina #easter
TGIF my friends! Make the most of your day and rem TGIF my friends! Make the most of your day and remember, your uniqueness is your greatest asset. ๐Ÿฅฐ #beyou #youruniquestyle #confidence #tgif #acraftylatina
Happy 1st day of Spring. A season of new beginnin Happy 1st day of Spring.  A season of new beginnings ๐Ÿฆ‹ #springisintheair #firstdayofspring #newbeginnings #acraftylatina
Contour in Cricut Design Space is a great way to c Contour in Cricut Design Space is a great way to create layered images.  Check out my new blog post; link in bio. #cricut #cricutmade #cricutdesignspace #cricuttutorial #cricutcontour #cricutforbeginners #acraftylatina #cricutmademedoit #cricutmade #stpatricksday
Monday hustle! Get up and show up. #mondayhustle Monday hustle! Get up and show up.  #mondayhustle #inspiration #mondaymotivation #acraftylatina
Are you ready for Santa? #cricutchristmas #cricut Are you ready for Santa? #cricutchristmas #cricut #cricutmade #oreo #cricutcrafts #vinylprojects #cricutaddict #acraftylatina #cricut
A little something for me ๐Ÿ˜Š #cricut #cricutmade A little something for me ๐Ÿ˜Š #cricut #cricutmade #cricutcrafts #htv #monogram #acraftylatina #makeupbag #easypress #cricuteasypress
Follow on Instagram
  • Home
  • Meet Arlene
  • Contact Me
  • Video Tutorials
wedding-invitations-with-your-cricut

Copyright © 2022 ยท Acraftylatina.com

Manage Cookie Consent
We use cookies to optimize our website and our service.
Functional cookies Always active
The technical storage or access is strictly necessary for the legitimate purpose of enabling the use of a specific service explicitly requested by the subscriber or user, or for the sole purpose of carrying out the transmission of a communication over an electronic communications network.
Preferences
The technical storage or access is necessary for the legitimate purpose of storing preferences that are not requested by the subscriber or user.
Statistics
The technical storage or access that is used exclusively for statistical purposes. The technical storage or access that is used exclusively for anonymous statistical purposes. Without a subpoena, voluntary compliance on the part of your Internet Service Provider, or additional records from a third party, information stored or retrieved for this purpose alone cannot usually be used to identify you.
Marketing
The technical storage or access is required to create user profiles to send advertising, or to track the user on a website or across several websites for similar marketing purposes.
Manage options Manage services Manage vendors Read more about these purposes
View preferences
{title} {title} {title}