ACRAFTYLATINA

  • Home
  • Special Projects
    • Weddings
      • Wedding Table Numbers
      • DIY Wedding Invitations with your Cricut
      • Wedding DIY Countdown Sign – ?? Until I Do
      • Wedding Planning Checklist
      • Abide by Second Wedding Etiquette; Says Who?
      • I Do in Las Vegas
      • Easy Cricut Wedding Projects
    • Sublimation
      • Sublimation to Expand Your Crafting Experience
    • Holidays & Seasonal
      • Make Dad’s Day Special With Your Cricut
      • Create Layers with Contour in Cricut Design Space
      • Fun Projects for Valentine’s Day
      • Home Decor for the Holidays
      • Custom 3-layer Christmas Ornament in Cricut Design Space
      • Christmas Countdown with Cricut
      • Freebies for your Holiday Decor with Cricut
      • Fun 4th of July Decor with Cricut
      • Mother’s Day Card With Your Cricut Joy
      • Mother’s Day Flower Shadow Box
      • Happy Spring Wreath Floral Display
      • Good Fortune This Valentine’s Day
      • Let Cricut Help Color Your Valentine
      • Love Mason Jar
      • Cricut-made Christmas Dish Towels
      • Personalized Christmas Stockings with Cricut
      • Santa’s Milk & Cookies Plate
      • Ornament in Memory of a Loved One
      • Glitzy Holiday Gift Tags
  • Everything Cricut
    • Don’t Be Afraid of Your Cricut, It’s Friendly
    • How to Use the Cricut Offset Feature
    • Top 10 Tips for Cricut Design Space
    • How to Draw with Cricut Infusible Ink Pens & Markers
    • Create Custom Stickers Using Your Cricut
    • Get the little ones ready for Back to School
    • Cricut Infusible Ink – What it is and How to Use It
    • Make Beautiful Flowers with Cricut Design Space
    • Family Birthdays Knockout Design
    • Unbox & Setup the New Cricut Joy
    • Write With Your Cricut
    • Upload Fonts To Use In Cricut Design Space
    • Mini but Mighty EasyPress
    • Uploading Your Image from PC to Design Space
    • How To Use Print Then Cut in Cricut Design Space?
    • How to Use Weld in Design Space
    • How to use Cricut’s Design Space Slice Feature
  • Video Tutorials
  • Favorite Crafting Supplies
  • Meet Arlene
  • Contact Me
  • Resource Library
  • Digital Products Etsy Shop

Get the little ones ready for Back to School

Everything Cricut

1 Aug

September is here and usually this is a great month for parents because it means the kids go back to school. Yes it’s a little unconventional this year, but we should maintain the excitement of it as it means growth for our children.

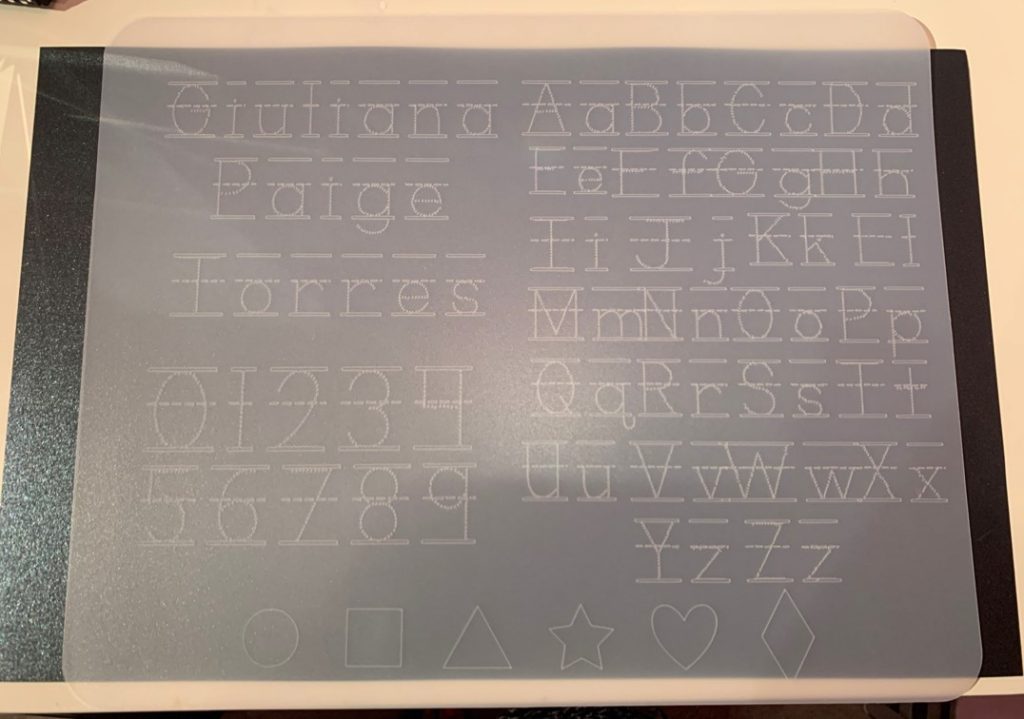
This year my granddaughter started pre-school for the first time and we were all so excited for her first day. Thankfully, she loved it and looks forward to going now. Of course, I want to help her in her journey so I crafted a tracing mat for her. This simple project will help her practice her name, letters, numbers and shapes. It can be used over and over again.

If you have pre-schoolers or know someone who does, this is a great back to school project. Let’s start with the supply list:

Click to Join ACraftyLatina

Supplies

This post contains some affiliate links for your convenience; this means if you make a purchase after clicking a link I will earn a small commission but it won’t cost you a penny more it will just help me to continue to be able to provide you great tutorials and free projects. As an Amazon Associate I earn from qualifying purchases.

Cricut Machine

Fine point blade

Purple Cricut Mat – strong grip (I used 12 x 24″ because I was using a larger surface)

Painters Tape (optional)

Flexible Clear Cutting Mat (I used the 12″ x 15″ one from Dollar Tree)

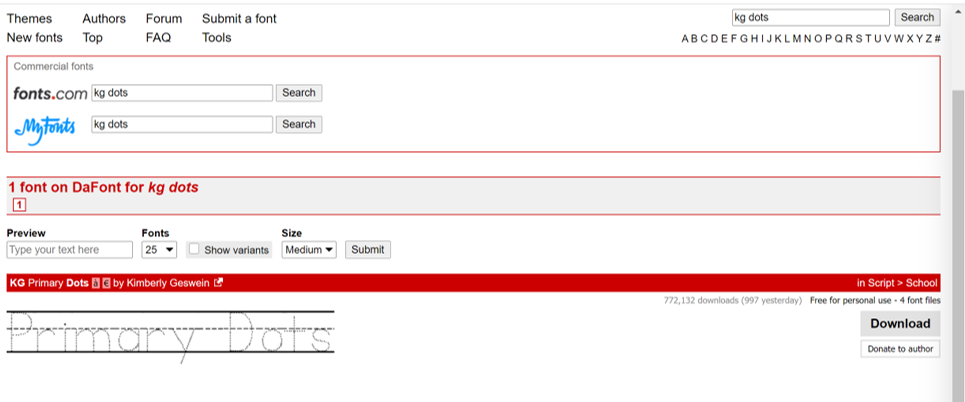
KG Primary Dots Font (see below how to get it)

Erasable Markers

Get Font For Design Space

So it’s really simple to add fonts into Design Space. I always use my PC because it’s much easier for me. Make sure to visit my post below for full instructions.

Also, when you go on Dafont, make sure to type on the search box on the right side KG Dots. That is the font I used for this. It was super helpful because it had the tracing lines all set up for each letter and number already. Also, always make sure to check the licensing rights for the font you are going to download. As you see here, right above the Download button, KG Dots is for personal use, so I’m ok to use it. Each font will have their own description there.

https://acraftylatina.com/upload-fonts-into-cricut-design-space/

Steps to Follow

Once you have uploaded your font. Open Design Space to get started. Click on shapes and make a rectangle the size of the mat you will be using so that you know your available spacing. Although my mat is 12 x 15″ I make it a little smaller because I don’t want it to write all the way to the edge. My rectangle size is 10.5 x 13.5″.

Select your KG Primary Dots font and start typing your text. Now, there are more than 1 KG Primary Dots fonts that download. For this back to school project, I used the KD Primary Dots Lined NOSPACE for this project.

Click to Join Resource Library

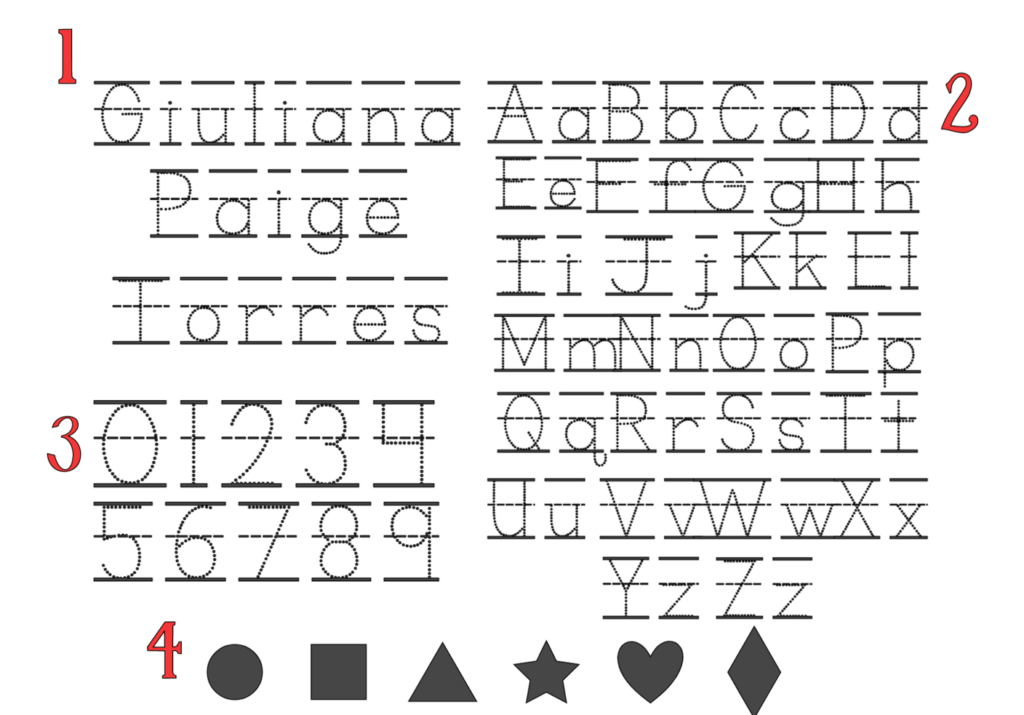
TIP: Group in sections. I did the name in 1 section, the letters in another, etc. That gives you more flexibility on spacing and placement of the grouping. For this project I have 4 groupings.

Start Typing

When you start typing you will see that each character is created from small dots and the top, middle and bottom line are already attached. This makes it so much easier to get this project done quickly. I chose to do 4 different sections, but you can do this with anything. You can use the names of colors, animals, different shapes, etc. It all depends at what level the child is. I started with the basic of her name, letters, numbers and shapes.

Once you are done creating all of your sections, highlight the entire project together and click on attach. Attaching is critical to the project because if you don’t attach everything when you hit Make It you will see a jumble of letters, numbers, shapes, etc. with no real structure and your back to school project will be a jumble mess.

Once you’ve attached, then go ahead and hit the Make It button and send to your preview screen.

Cricut Joy Machine

Preview Settings

In the preview screen you must remember to MIRROR YOUR IMAGE. We have to do this because we will be cutting this in reverse so that when you flip it you can read it correctly and that is the side they will be writing on. The cutting happens on the back of the cutting board mat.

Custom Settings

Once you mirror, hit continue and if using the Explore machine you will need to set the dial to Custom setting. Select the Kraft Board material setting and change it to more pressure.

Note: It will not cut through the thick mat; you DON’T want it to cut through. It will just cut enough to make the outlines you need.

Place your cutting board mat on the purple Cricut mat and if it’s not sticky enough you may have to use painters tape to keep it down. It’s important that it does not move through the process. You will see the cutting board mat has a shiny side, place that side down on your mat.

Top 10 Tips for Cricut Design Space
https://acraftylatina.com/top-10-tips-for-cricut-design-space/

Making It

Once your surface is secure on the purple strong grip mat, click continue. Now this is the part that will test your patience. My project took 2 hours to cut…YES, you read that right, 2 HOURS! Because of all of the little dots that make up each letter, it takes forever. So you must be patient. Lucky I have more than 1 machine so I could work on other things at the same time. I suggest you Set it and Forget It! Go make dinner, run errands, whatever takes 2 hours, because your machine will be busy for that long.

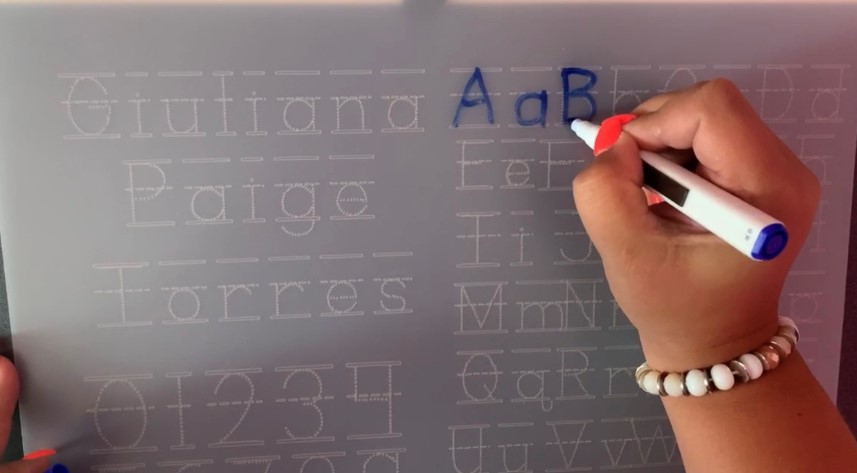
Once it’s finished cutting, remove the surface off of your purple mat. You should feel all of the letters and little dots that were cut but it should not have cut through to the other side. The other side will be smooth and look like a tracing board.

It took forever to cut, BUT, I must say the finished product is so worth it! Make sure to watch the video below so that you can see the process.

@acraftylatina

Kids Tracing mat #cricut101 #cricuttiktok #cricuthacks #cricuttips #cricutmaker #cricutexploreair2 #cricuttutorials #cricutmade #designspace

♬ original sound – Arlene

I hope you get a chance to make one of these back to school project; I would love to see what you create. As always, thank you for stopping by and sharing in my joy. Please remember to always Love What You Do and Do What You Love.

Arlene signature

Related Articles:

Wedding Table Numbers

Write With Your Cricut

Tweet
Share
Pin4
Share
4 Shares

Subscribe

Sign up for the latest news and updates

Previous Post: « Fun 4th of July Decor with Cricut

Primary Sidebar

Let’s Connect

  • Email
  • Facebook
  • Instagram
  • Pinterest
  • YouTube

Meet Arlene

Welcome to ACraftyLatina! My name is Arlene González-Pagán and my passion is helping others. Read More…

Latest on Instagram


Love being creative? Then use @Canva to highlight
Love being creative?  Then use @Canva to highlight your tutorials for #cricut or any of your #diy #crafts #canvalove #acraftylatina #canva #canvasocialmedia #cricutdesignspace #cricutcontour #socialmediamarketing

Celebrated my birthday and needed to start with ce
Celebrated my birthday and needed to start with celebrating me #affirmations #htv #cricutmade #birthdayweekend

Celebrated my bday this weekend and started with t
Celebrated my bday this weekend and started with the best affirmation and attitude #psiloveme #acraftylatina #cricutmade #htv #birthdayweekend

Happy Mother’s Day! May you have a beautiful day
Happy Mother’s Day! May you have a beautiful day surrounded by love 💗 #mothersday #momlife #momsofinstagram #acraftylatina

Getting ready for #mothersday #momgifts #cricutmad
Getting ready for #mothersday #momgifts #cricutmade #makeitwithmichaels #diycrafts #acraftylatina

Get ready for #mothersday #momgifts #lovemom #cric
Get ready for #mothersday #momgifts #lovemom #cricutmade #madewithcricut #diycrafts #htvvinyl #acraftylatina


Follow on Instagram


Subscribe

Sign up for latest news and updates

Browse by Category

  • Cricut
  • Everything Cricut
  • Special Events
    • Holidays & Seasonal
    • Weddings
  • Sublimation
Love being creative? Then use @Canva to highlight Love being creative?  Then use @Canva to highlight your tutorials for #cricut or any of your #diy #crafts #canvalove #acraftylatina #canva #canvasocialmedia #cricutdesignspace #cricutcontour #socialmediamarketing
Celebrated my birthday and needed to start with ce Celebrated my birthday and needed to start with celebrating me #affirmations #htv #cricutmade #birthdayweekend
Celebrated my bday this weekend and started with t Celebrated my bday this weekend and started with the best affirmation and attitude #psiloveme #acraftylatina #cricutmade #htv #birthdayweekend
Happy Mother’s Day! May you have a beautiful day Happy Mother’s Day! May you have a beautiful day surrounded by love 💗 #mothersday #momlife #momsofinstagram #acraftylatina
Getting ready for #mothersday #momgifts #cricutmad Getting ready for #mothersday #momgifts #cricutmade #makeitwithmichaels #diycrafts #acraftylatina
Get ready for #mothersday #momgifts #lovemom #cric Get ready for #mothersday #momgifts #lovemom #cricutmade #madewithcricut #diycrafts #htvvinyl #acraftylatina
Great for Mother’s Day! #shadowbox #cricutmade # Great for Mother’s Day! #shadowbox #cricutmade #rolledflowers #rolledflowershadowbox #acraftylatina #madewithcricut #makeitwithmichaels #mothersday #mothersdaygift
Quick card with #cricutjoy #cricutjoycards #cricut Quick card with #cricutjoy #cricutjoycards #cricutjoycraft #cricut #easter #eastercards #diycrafts #acraftylatina
Fun Easter projects; blog link in bio #acraftylati Fun Easter projects; blog link in bio #acraftylatina.com #diycrafts #coloring #eastercrafts #craftingismytherapy #cricutmade #acraftylatina #easter
I’m loving the new #cricutoffset feature. #cric I’m loving the new #cricutoffset feature.  #cricutdesignspace #cricuttutorial #madewithcricut #acraftylatina #cricutcrafts #cricutstickers #diystickers #printthencut
Follow on Instagram
  • Home
  • Meet Arlene
  • Contact Me
  • Video Tutorials
wedding-invitations-with-your-cricut

Copyright © 2022 · Acraftylatina.com

Manage Cookie Consent
We use cookies to optimize our website and our service.
Functional cookies Always active
The technical storage or access is strictly necessary for the legitimate purpose of enabling the use of a specific service explicitly requested by the subscriber or user, or for the sole purpose of carrying out the transmission of a communication over an electronic communications network.
Preferences
The technical storage or access is necessary for the legitimate purpose of storing preferences that are not requested by the subscriber or user.
Statistics
The technical storage or access that is used exclusively for statistical purposes. The technical storage or access that is used exclusively for anonymous statistical purposes. Without a subpoena, voluntary compliance on the part of your Internet Service Provider, or additional records from a third party, information stored or retrieved for this purpose alone cannot usually be used to identify you.
Marketing
The technical storage or access is required to create user profiles to send advertising, or to track the user on a website or across several websites for similar marketing purposes.
Manage options Manage services Manage vendors Read more about these purposes
View preferences
{title} {title} {title}