ACRAFTYLATINA

  • Home
  • Special Projects
    • Weddings
      • Wedding Table Numbers
      • DIY Wedding Invitations with your Cricut
      • Wedding DIY Countdown Sign – ?? Until I Do
      • Wedding Planning Checklist
      • Abide by Second Wedding Etiquette; Says Who?
      • I Do in Las Vegas
      • Easy Cricut Wedding Projects
    • Sublimation
      • Sublimation to Expand Your Crafting Experience
    • Holidays & Seasonal
      • Make Dad’s Day Special With Your Cricut
      • Create Layers with Contour in Cricut Design Space
      • Fun Projects for Valentine’s Day
      • Home Decor for the Holidays
      • Custom 3-layer Christmas Ornament in Cricut Design Space
      • Christmas Countdown with Cricut
      • Freebies for your Holiday Decor with Cricut
      • Fun 4th of July Decor with Cricut
      • Mother’s Day Card With Your Cricut Joy
      • Mother’s Day Flower Shadow Box
      • Happy Spring Wreath Floral Display
      • Good Fortune This Valentine’s Day
      • Let Cricut Help Color Your Valentine
      • Love Mason Jar
      • Cricut-made Christmas Dish Towels
      • Personalized Christmas Stockings with Cricut
      • Santa’s Milk & Cookies Plate
      • Ornament in Memory of a Loved One
      • Glitzy Holiday Gift Tags
  • Everything Cricut
    • Don’t Be Afraid of Your Cricut, It’s Friendly
    • How to Use the Cricut Offset Feature
    • Top 10 Tips for Cricut Design Space
    • How to Draw with Cricut Infusible Ink Pens & Markers
    • Create Custom Stickers Using Your Cricut
    • Get the little ones ready for Back to School
    • Cricut Infusible Ink – What it is and How to Use It
    • Make Beautiful Flowers with Cricut Design Space
    • Family Birthdays Knockout Design
    • Unbox & Setup the New Cricut Joy
    • Write With Your Cricut
    • Upload Fonts To Use In Cricut Design Space
    • Mini but Mighty EasyPress
    • Uploading Your Image from PC to Design Space
    • How To Use Print Then Cut in Cricut Design Space?
    • How to Use Weld in Design Space
    • How to use Cricut’s Design Space Slice Feature
  • Video Tutorials
  • Favorite Crafting Supplies
  • Meet Arlene
  • Contact Me
  • Resource Library
  • Digital Products Etsy Shop

Happy Spring Wreath Floral Display

Holidays & Seasonal

25 Mar

There’s nothing like Spring.  Because I’m a May baby, it’s my favorite season.  There’s something so wonderful and exciting when you see the flowers starting to bloom, you hear the birds in the morning and you feel the warmth of the sun.  Spring to me means rebirth and new beginnings. So, of course, why not mark the occasion with a new home decor, the Happy Spring Wreath.

Deciding on Style

Traditionally wreaths are circular and either made from twigs, pine or holly with leaves and flowers for decor.  However, they don’t always have to be that way. The beauty of being a crafter is that there is no limit to your imagination and you can create it however you want.

I am currently in the phase of loving the black chalkboards with white vinyl; it makes the design pop.  So I decided to go with that style and make the paper flowers serve as the colorful accents.

Shapes Matter

The other craze I’m currently into are geometric shapes.  If you decide to mix and match geometric shapes in the same design, you want to make sure they are complementary to each other.  Since I was going to make a wreath and they are traditionally round, I decided to use my hexagon board as the complementary shape.  It’s a great balance of old and new.

Supplies Needed

  • Hexagon Chalkboard or other style preferred
  • White vinyl
  • Cricut Explorer Air 2 or Maker
  • Weeding Tools
  • Accent flowers of your choosing (or you can leave it as is)

Finding your Wreath

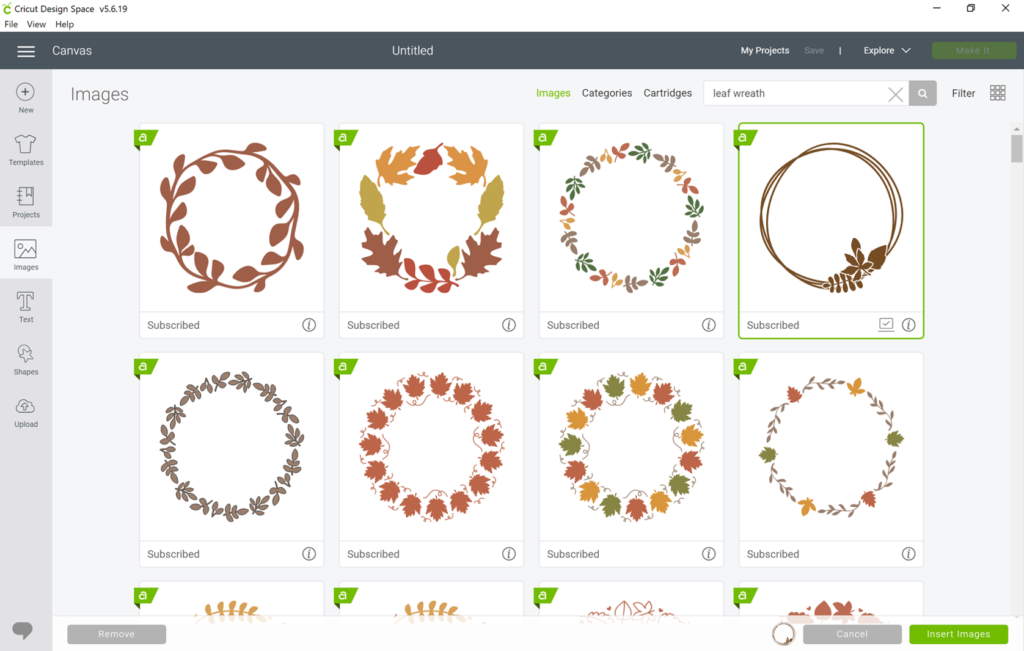
The first step is to find the right wreath shape in Design Space.  We want it to be circular but not too traditional. So search for leaf wreaths.  There are many options but the last one in the first row is perfect. It has the circular pattern we are looking for but with a little flair.

Click on it so that it has a green box around it and the image also shows on the bottom of your screen.  Go ahead and click Insert Images. 

Once it is on your canvas, resize to fit the size board you are using.  I am resizing this one to 11.5 x 11.5 as the board is 14” and the maximum size I can cut vinyl on Cricut is 11.5.  At this point you should change the color of the wreath to whatever color you like; I chose white for this project. 

Picking Leaves (Yes in Spring)

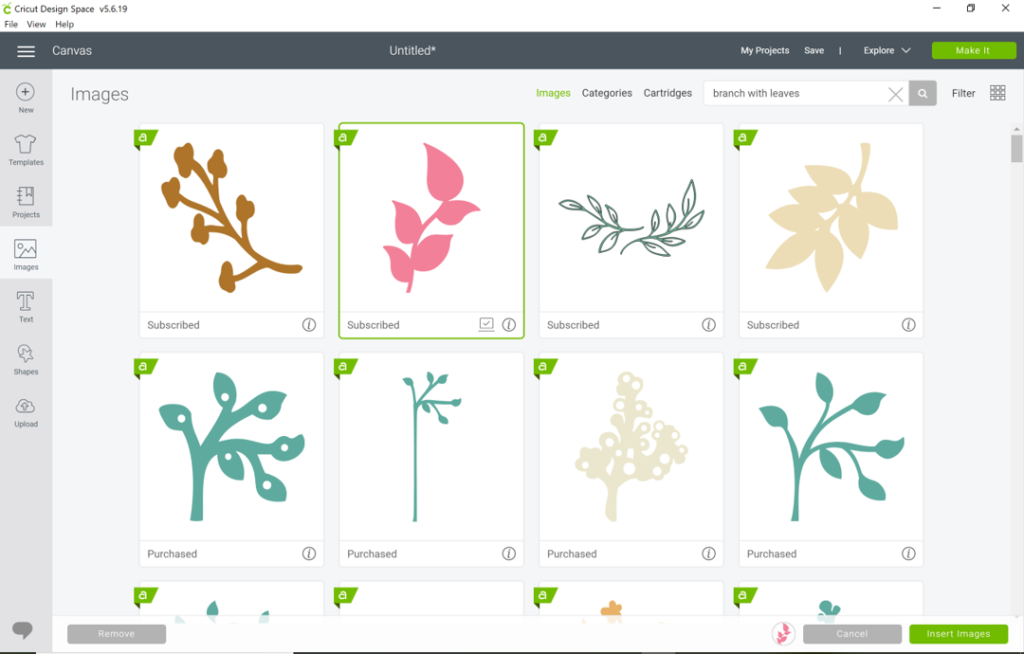
Now that you have selected the wreath you have a choice of leaving as is or adding some additional leaves to  enhance the look. If you choose to add leaves, search images again for the leaves or branches you like. For this project, I searched images and searched branch with leaves.

I immediately spotted the pink leaves amongst the other boring colors.  They had a unique shape, the leaves had some space between them and it looked like a fun image; perfect for our Happy Spring Wreath.

Customizing your Happy Spring Wreath

Leaving the circle wreath as is, is perfectly fine.  However, one way of adding more dimension and interest  to it is by adding leaves. The first thing is to change the color of the leaf you selected to the same color of your wreath design.  In this instance I’m changing it to white.

Click on your leaf design and hit duplicate.  Make as many leaves as you would like to add to your design and place them around your wreath.

Tip:  You can resize the leaves, flip them horizontally and vertically. Watch my video below for all of the details.

Welding – Get it together!

For this piece we use a great feature within Cricut Design Space, welding.

Once you have all of the leaves (and any other things you’d like to add) placed where you want them, highlight the entire design.  You can do this 1 of 2 ways.

1. Put your cursor at the corner above your entire design.  Hold down the mouse key and drag your mouse until you have made a box around your entire wreath.  Make sure to include all of the additional elements in there. Once you’ve highlighted everything, let go.  It should all be within a box.

2, Click on your wreath, hold down the shift key and then click on each of the leaves and additional items you chose.  As you click on each thing you will see they all start coming together in 1 box.  

If you look on your layers panel to the right, you should see all of the items are now in a darker grey box.  If anything is in a lighter shaded box, that means you have NOT selected that item and it will not be welded with the rest.

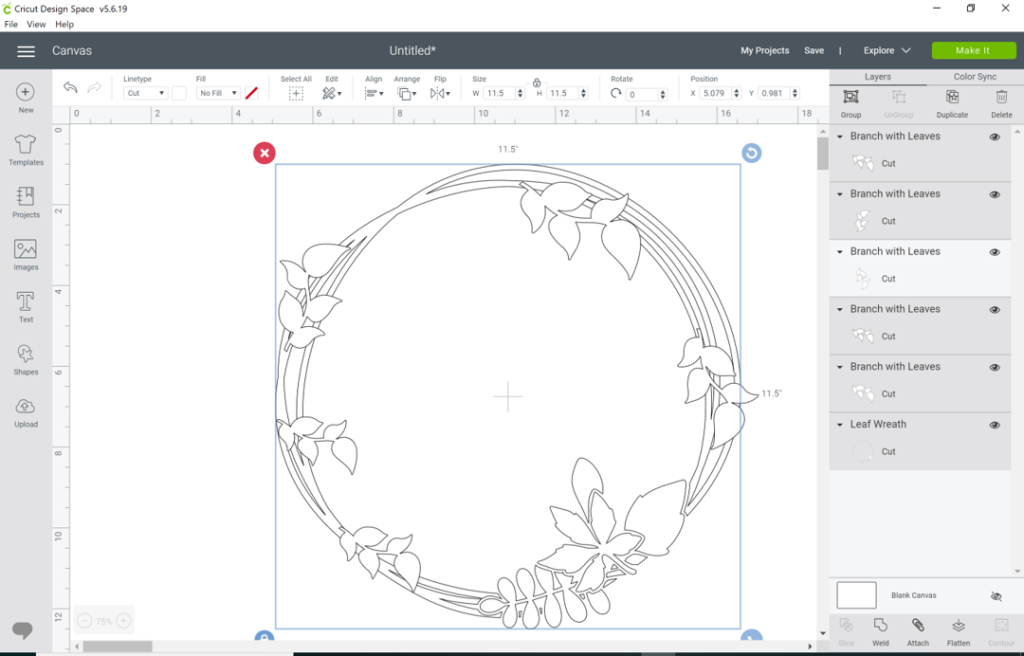
Once everything is selected, hit weld on the bottom right hand corner.  Your design will now be 1 full image. Now it’s time to add your text.

Tip:  Once welded, re-check the size of your design.  If you’ve added any elements that are outside of the original wreath it may have increased the overall size of your design.

Happy Spring

Now that your wreath is complete, you can add whatever saying you would like. This project will have Happy Spring on it celebrating the first day of Spring 2020 but you can put Happy Easter, Hello Spring or anything else.  You may want this for something completely different or a hallway entrance and just put Hello or Welcome on it.  The design can work with anything you want.

Choose whatever font is your favorite, type your text and align it accordingly on the wreath.  

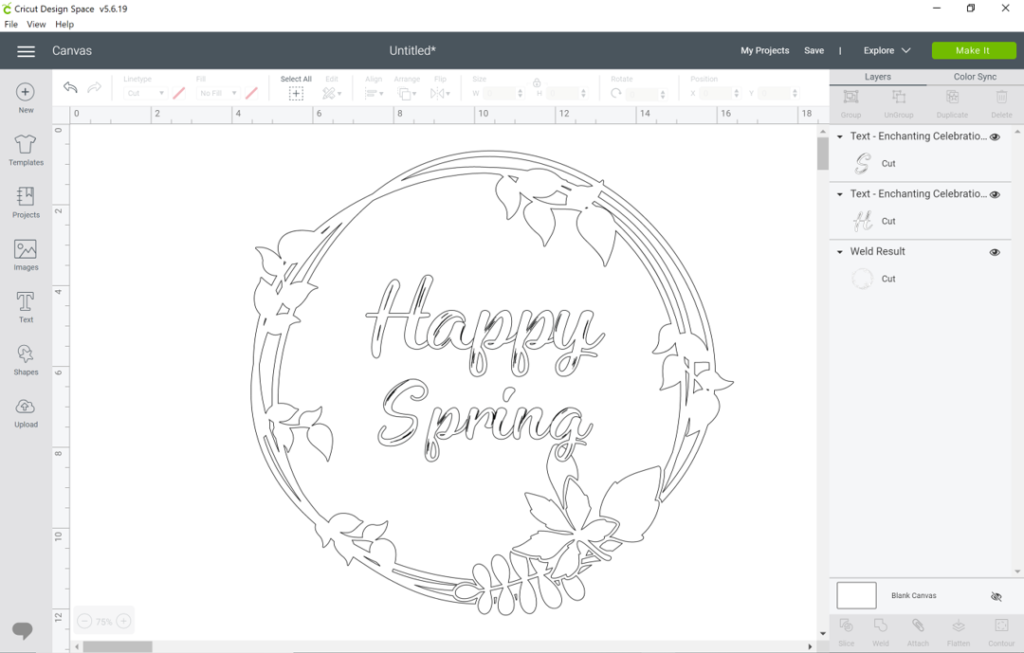
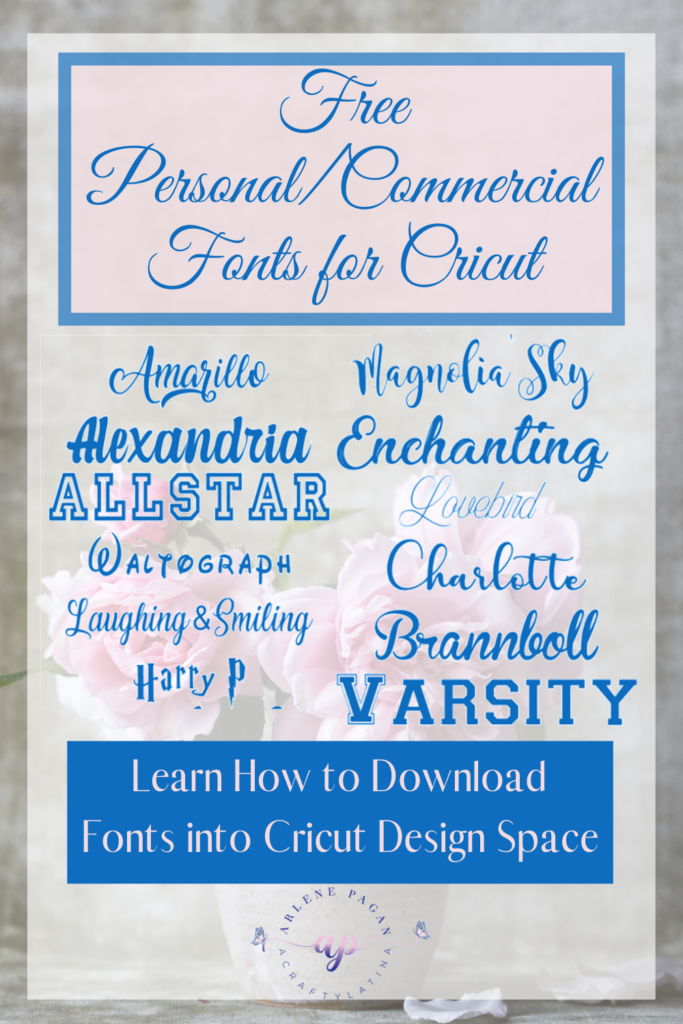
Note:  This project uses the Enchanting Celebrations font downloaded from dafont.com.  As you can see it has some small cuts within the font.  Watch the video below to see how I use the Contour feature to eliminate those.

Your beautiful design is complete, now go cut it, weed it and display it in your home.  There really is nothing like custom decor made by you. This also makes a beautiful gift for newlyweds or new homeowner.

Check out these 24 beautiful DIY Spring Wreaths featured in Good Housekeeping.

If you create any of my projects, I would love to see a picture and if you share on social media you can use the hashtag #Acraftylatina. 

As always, remember to Do What You Love & Love What You Do.  Please feel free to comment or ask any questions below.

Upload fonts into Cricut Design Space

Related Articles:

Create Layers with Contour in Cricut Design Space

Fun Projects for Valentine’s Day

Tweet
Share
Pin3
Share
3 Shares

Subscribe

Sign up for the latest news and updates

Previous Post: « Wedding Table Numbers
Next Post: Unbox & Setup the New Cricut Joy »

Primary Sidebar

Let’s Connect

  • Email
  • Facebook
  • Instagram
  • Pinterest
  • YouTube

Meet Arlene

Welcome to ACraftyLatina! My name is Arlene González-Pagán and my passion is helping others. Read More…

Latest on Instagram


Love being creative? Then use @Canva to highlight
Love being creative?  Then use @Canva to highlight your tutorials for #cricut or any of your #diy #crafts #canvalove #acraftylatina #canva #canvasocialmedia #cricutdesignspace #cricutcontour #socialmediamarketing

Celebrated my birthday and needed to start with ce
Celebrated my birthday and needed to start with celebrating me #affirmations #htv #cricutmade #birthdayweekend

Celebrated my bday this weekend and started with t
Celebrated my bday this weekend and started with the best affirmation and attitude #psiloveme #acraftylatina #cricutmade #htv #birthdayweekend

Happy Mother’s Day! May you have a beautiful day
Happy Mother’s Day! May you have a beautiful day surrounded by love 💗 #mothersday #momlife #momsofinstagram #acraftylatina

Getting ready for #mothersday #momgifts #cricutmad
Getting ready for #mothersday #momgifts #cricutmade #makeitwithmichaels #diycrafts #acraftylatina

Get ready for #mothersday #momgifts #lovemom #cric
Get ready for #mothersday #momgifts #lovemom #cricutmade #madewithcricut #diycrafts #htvvinyl #acraftylatina


Follow on Instagram


Subscribe

Sign up for latest news and updates

Browse by Category

  • Cricut
  • Everything Cricut
  • Special Events
    • Holidays & Seasonal
    • Weddings
  • Sublimation
Love being creative? Then use @Canva to highlight Love being creative?  Then use @Canva to highlight your tutorials for #cricut or any of your #diy #crafts #canvalove #acraftylatina #canva #canvasocialmedia #cricutdesignspace #cricutcontour #socialmediamarketing
Celebrated my birthday and needed to start with ce Celebrated my birthday and needed to start with celebrating me #affirmations #htv #cricutmade #birthdayweekend
Celebrated my bday this weekend and started with t Celebrated my bday this weekend and started with the best affirmation and attitude #psiloveme #acraftylatina #cricutmade #htv #birthdayweekend
Happy Mother’s Day! May you have a beautiful day Happy Mother’s Day! May you have a beautiful day surrounded by love 💗 #mothersday #momlife #momsofinstagram #acraftylatina
Getting ready for #mothersday #momgifts #cricutmad Getting ready for #mothersday #momgifts #cricutmade #makeitwithmichaels #diycrafts #acraftylatina
Get ready for #mothersday #momgifts #lovemom #cric Get ready for #mothersday #momgifts #lovemom #cricutmade #madewithcricut #diycrafts #htvvinyl #acraftylatina
Great for Mother’s Day! #shadowbox #cricutmade # Great for Mother’s Day! #shadowbox #cricutmade #rolledflowers #rolledflowershadowbox #acraftylatina #madewithcricut #makeitwithmichaels #mothersday #mothersdaygift
Quick card with #cricutjoy #cricutjoycards #cricut Quick card with #cricutjoy #cricutjoycards #cricutjoycraft #cricut #easter #eastercards #diycrafts #acraftylatina
Fun Easter projects; blog link in bio #acraftylati Fun Easter projects; blog link in bio #acraftylatina.com #diycrafts #coloring #eastercrafts #craftingismytherapy #cricutmade #acraftylatina #easter
I’m loving the new #cricutoffset feature. #cric I’m loving the new #cricutoffset feature.  #cricutdesignspace #cricuttutorial #madewithcricut #acraftylatina #cricutcrafts #cricutstickers #diystickers #printthencut
Follow on Instagram
  • Home
  • Meet Arlene
  • Contact Me
  • Video Tutorials
wedding-invitations-with-your-cricut

Copyright © 2022 · Acraftylatina.com

Manage Cookie Consent
We use cookies to optimize our website and our service.
Functional cookies Always active
The technical storage or access is strictly necessary for the legitimate purpose of enabling the use of a specific service explicitly requested by the subscriber or user, or for the sole purpose of carrying out the transmission of a communication over an electronic communications network.
Preferences
The technical storage or access is necessary for the legitimate purpose of storing preferences that are not requested by the subscriber or user.
Statistics
The technical storage or access that is used exclusively for statistical purposes. The technical storage or access that is used exclusively for anonymous statistical purposes. Without a subpoena, voluntary compliance on the part of your Internet Service Provider, or additional records from a third party, information stored or retrieved for this purpose alone cannot usually be used to identify you.
Marketing
The technical storage or access is required to create user profiles to send advertising, or to track the user on a website or across several websites for similar marketing purposes.
Manage options Manage services Manage vendors Read more about these purposes
View preferences
{title} {title} {title}