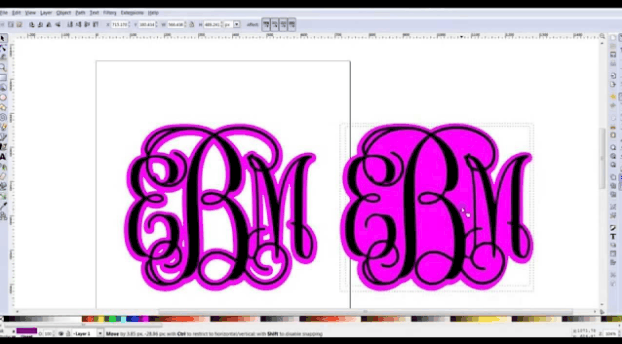
Making a monogram for your business requires you to have creativity and good knowledge to actually off pull off a great-looking logo for yourself. Though it isn’t as easy as it sounds, it isn’t that difficult either as one of the things that will be helping you to make this logo will be Cricut.
Cricut is a computer-controlled cutting machine designed for people who like to show off their art on a smaller scale. These machines are used for cutting paper, felt, fabric, vinyl, leather, mat board, wood, and are used to display animation on different surfaces.
Cricut has been pretty successful in recent times. Its success has been reflective of the fact that it filed for an IPO in March 2021. Cricut has licensing agreements with Disney, Pixar, Nickelodeon, Sesame Street, DC Comics, and Hello Kitty. These are the top names that work with Cricut now and the list will only keep on growing.
Today, we shall be seeing how to make a layered monogram on Cricut step-by-step. Cricut Design Space goes through several updates every now and then but the most important parts of its interface don’t change, which is why it offers such a convenience to users.
First off, with your monogram in Circuit Design Space, make sure it’s selected then change it to print by clicking on the drop-down Full menu at the top. Click on Make it and then Continue on the Prepare Screen.
Click on Send to the printer and you should get a pop-up for the entire printing process. This pop-up could vary for PC and Macs. For the printer options, you get to save as Print to PDF option, if you somehow have a save as JPEG or PNG then that’s well and good because that is going to be the next step. Make sure the Add Bleed is toggled ON and then click on Print. Save your file name in the location you want to.

Now you will need to convert the PDF to a PNG. You can use a converting website such as freepdfconvert.com. If you know any other websites that could help in conversion then you could use that as well. This was the one that turned out to be the most convenient one for us. Click on Choose PDF and then on your file.
It will convert and then click on the Download button. Go back into the Design Space and click on Upload and then browse. Find the shadow monolayer PNG and then select it. Click on Complex and now it’s the time to clean this monolayer up. Make sure to choose the wand option in the upper-left corner and then use your cursor to click on all the white spaces so that they are selected and there aren’t any white spaces left. To get rid of the square, you can either use the crop function or choose the eraser and erase the line with your cursor.
After you’ve gotten rid of the square, only a few minor steps remain. Click on Continue and then save as Cut Image and then save. Now insert this layered monogram into your canvas. You might need to Send to Back then drag the double arrows to size it down so that it manages to create the shadow behind the monogram.
And that friends and fans are all there is to creating a layered monogram on Cricut. You can use this technique with almost anything you want. Anything that lifts your creativity and makes people impressed with your work is something you can achieve with Cricut. And when you begin designing logos and monograms like these, people will only have good things to say about your work.

