Cricut is a fantastic platform to show your creativity and a place where you can do so much with just basic knowledge of arts and crafts. Yet, when you face a situation as dire as the one we’re going to come across today, it can be difficult to operate Cricut with ease. The problem we shall be addressing today is how you will cut multiple colors on a single Cricut Mat. Many users have spoken about this problem which is why we finally decided to address it today without any more delays.
The tip to cut multiple colors on a single mat is by attaching all of the different colors in a single final piece and then cut them. Depending on the design you would like to cut, there will be extra things you will need to do so make sure to read the entire method we’ll be told so you don’t find any more difficulties in cutting multiple colors. And no, the solution to this isn’t clicking every single button there is on the screen. Though it may be a little annoying at first listen to our guide and you’ll get through this problem in no time.
Always practice on paper first to get the hang of this method. Once you get a good hand, only then should you move to Cricut, or else there is going to be a big risk of your messing up your entire project. Now, we shall be listing down the steps needed to cut multiple colors on one Cricut Mat.
Steps On How to Cut Multiple Colors on one Cricut Mat?
Follow these steps:
Step – 1: Upload your Design
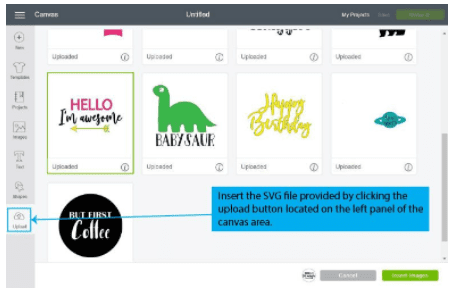
The first thing you need to do is upload an SVG file to the Design Space. You can do this method by clicking on the upload button which is located on the left panel of the canvas area. Once you upload it, select it and then click on the Insert Images option.

Step – 2: Clean your Design
Before you begin to cut your image, it will need some tweaking done to make it look better than it is. Now, you will select it and click on ungroup. Then, you will select all of the letters that make up your design and click on the weld.
Step – 3: Attach Design and Make It
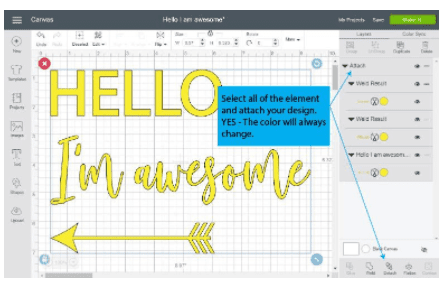
Once you’re done organizing every element on your design and giving its own space then select all of the elements and click on Attach, then press Make It. After attaching the designs, you will see that all the designs pick up a single color. This will always happen because the number of colors dictates the number of mats you’ll be using and in this case, we want it to be one color since we have only one Mat. When you attach something, you command the software that all the elements of your design will remain together when you send your project to be cut.

Once you click on “Make It”, you will then see that all the elements of your design are now in one mat. Now for each element, you can see above, you will need to cut 3 strips but be careful not to overlap them. You can use different colors for “Hello”, “I’m awesome”, and an arrow. Once all the different stripes of color are cut then stick them to the mat and load it to the Cricut. Choose your materials on Cricut Design Space or Smart Set Dial (Explore Family Machine) and press the make it button!
Once your Cricut is done cutting, weed and remove materials from the mat then proceed to transfer your design. That’s how it is done! Congratulations! You just cut your entire project on a single Cricut Mat! Pat yourself on the back!

