I have now been using Cricut for a couple of years and I’m still surprised when I find little tips and tricks that make my life so much easier or save me money on materials. So, of course, I wanted to share them with you so that you could use them too. Here are my Top 10 Tips for Cricut Design Space. Comment below if you learned something new or if you have a tip you would like to share.
Tip #1 – Tag Images You Upload
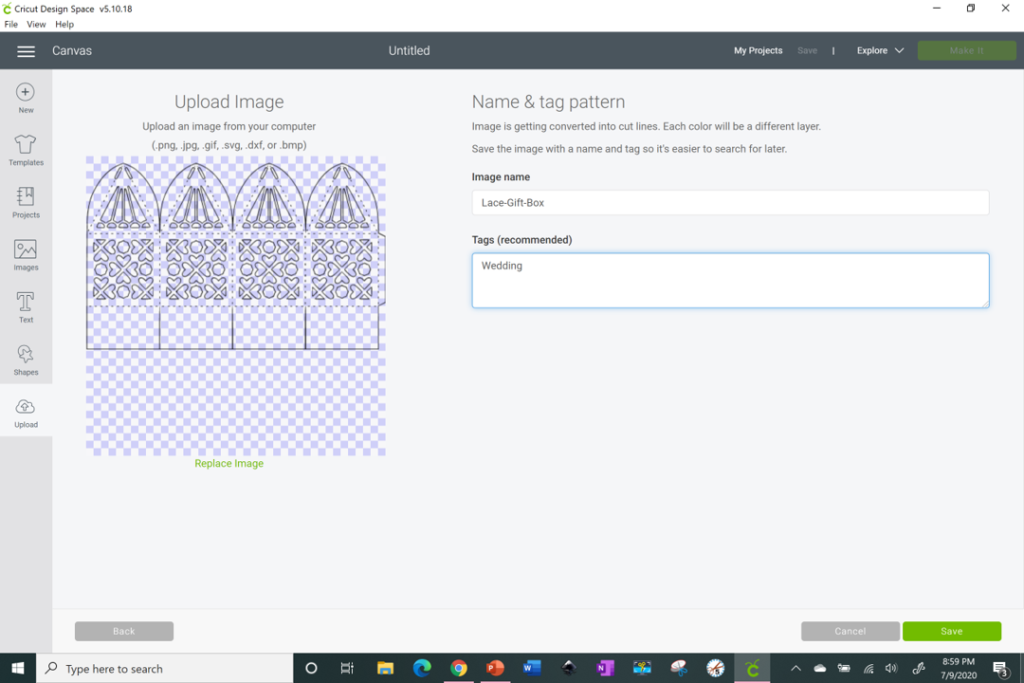
Oh how I wish there was a way that we could organize our images on Design Space by folders or rename images we’ve uploaded in the past so that we can find them so much easier. Unfortunately, currently there is no way to either rename your file or create folders for organization. Soooooo, you have to be really mindful when uploading an image to add a “tag” name so that later you can find it. In this example I will save this lace favor box with the tag of wedding.
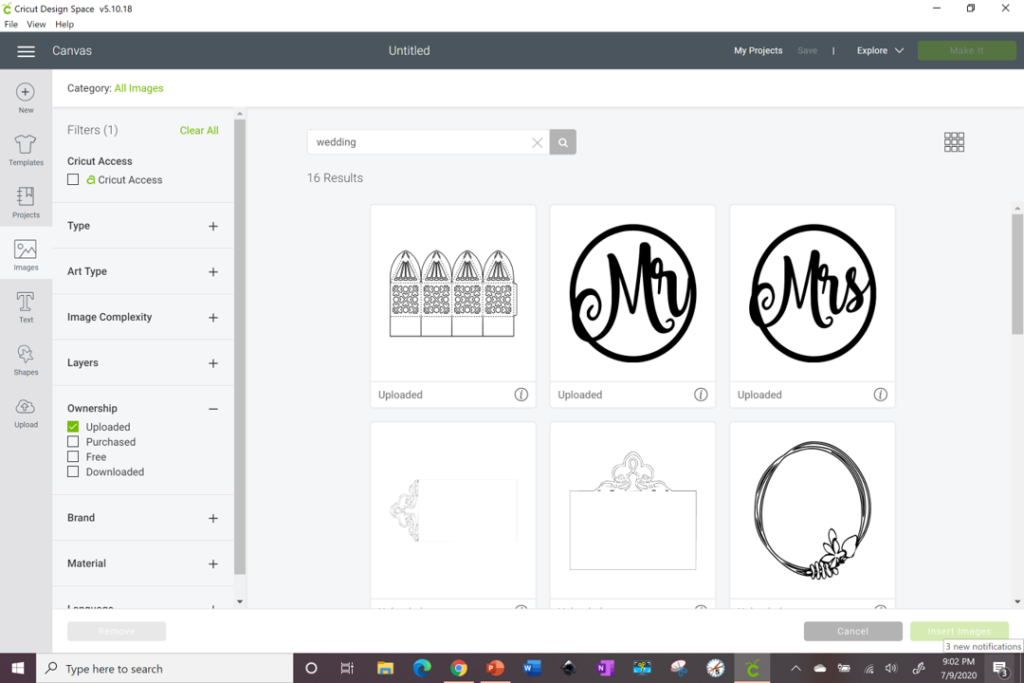
Once you’ve tagged your image it saves all images with the same tag in a grouping. When you’re ready to look for that image, you would just click on images, type the tag name, go to the left under ownership and click uploaded and all of your files with that same tag will pop up. Now that I need my wedding lace favor box, I follow these steps and everything I’ve tagged with the word wedding will pop up.
Tip #2 – Change Color of Canvas
How many times do you wish you could visualize what your image would look like on the specific color backing you will be placing it on. Well, you can. In this tip for Cricut Design Space I will show you how.
Have you ever noticed on the right side of Design Space, at the bottom of the layers panel you have something that says Blank Canvas and it’s always hidden, the little eye crossed out? If you click on that word at the top of your toolbar you will see the word Color and a little box pop up. Click on that little box and you will see a selection of colors to choose from. Select one and watch how your canvas magically changes colors. It’s so great to now be able to change the color to match either the vinyl, wall or other background color you will be using for your final project.
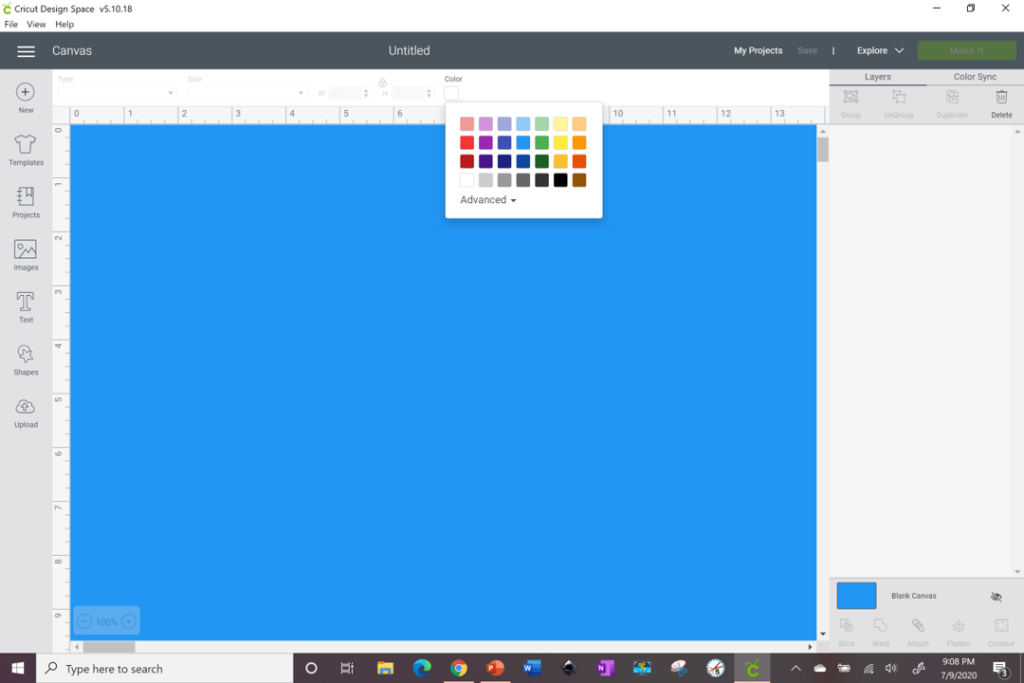
Don’t worry, changing your canvas color will not affect your project at all. It’s as if it doesn’t even exist. You can leave it as a color or change it back to white, it’s up to you.
Tip #3 – Add or Remove Grid Lines
I don’t know about you but I find it so helpful to have grid lines on my Canvas. It helps me keep an eye on measurement and placement of my projects. However, there are some times when I don’t want to see the grid lines. For example, if I want to “snip” a copy of my image to save to my computer, I don’t want to see the gridlines in my final picture.
WAIT! You don’t know how to save an image from Design Space to your computer?? Well, I have the right video for you, I will link it below.
Now to either add or remove the grid lines, all you have to do is go to the top left corner where the 3 lines are. Click on those lines and go to settings, you will see your 3 grid line choices there.
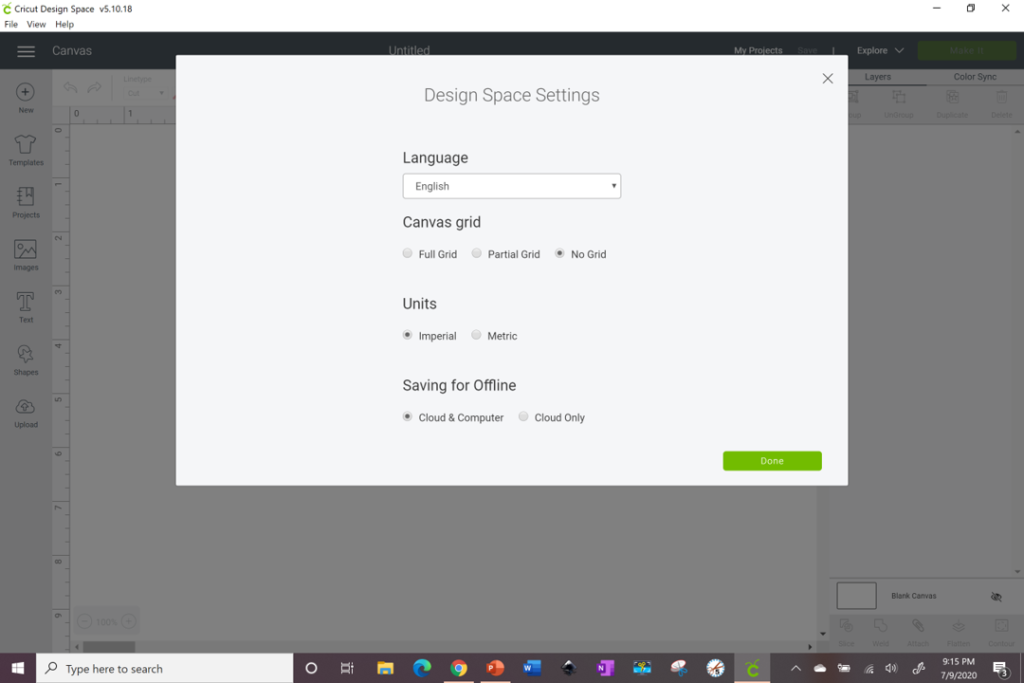
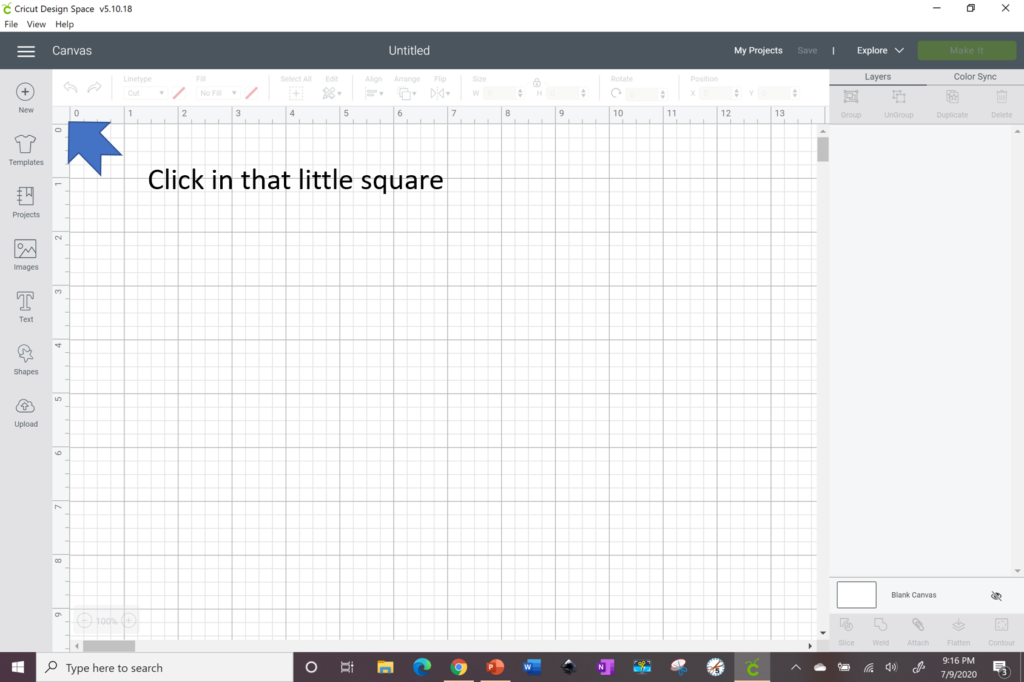
BUT WAIT, I have a quicker way for you. You see that little box at the top left between the upper and side rulers. Well, if you click in that little box you will get the same 3 toggle options for grid lines without even having to go into settings. How about that for convenience.
Tip #4 – Color Sync
In that handy layers panel on the right we find Color Sync. This is so helpful when you have many layers and you want to play around with the colors. Did you know that you could change the color of one of your layers without having to ungroup, detach or touch anything on the Canvas itself? It’s all done through Color Sync on the layers panel. When you click on Color Sync, it organizes all of your layers by their colors.
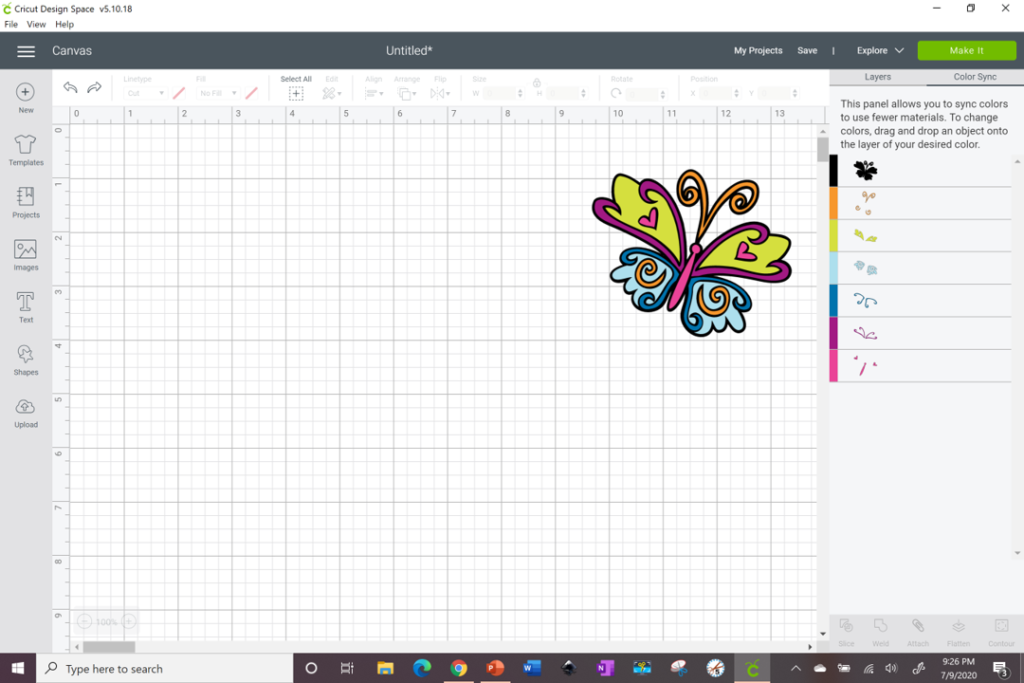
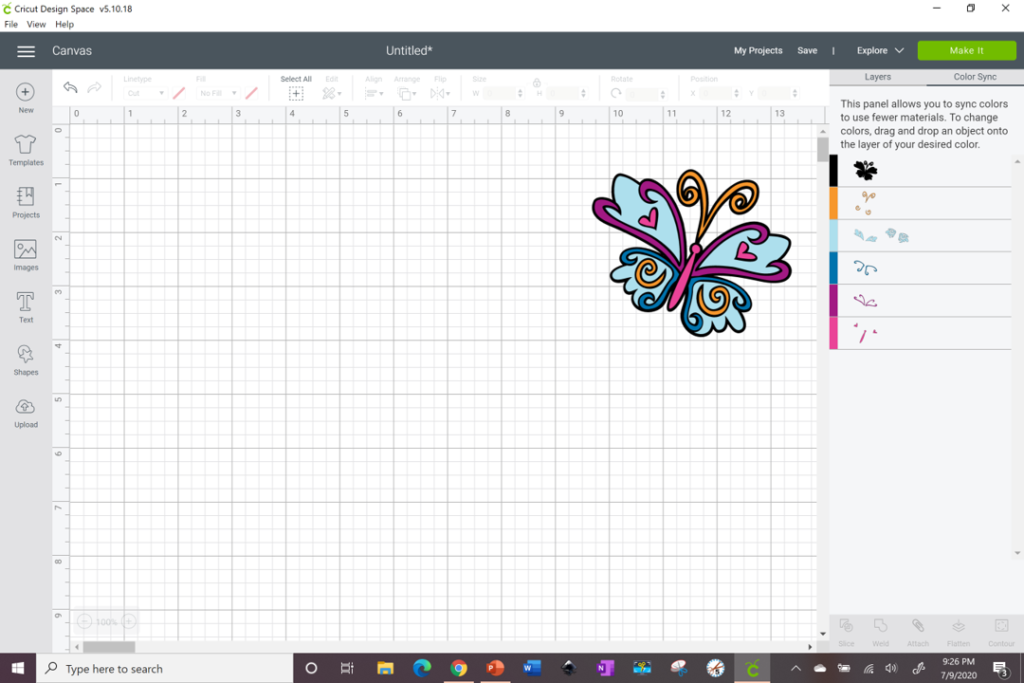
If you want to change the color of your layers, click and drag that layer into the new color section you want and Voila. See here, I selected the inside of the upper wings and wanted it to match the bottom section. I just moved that layer to the same color as the bottom and automatically it changes color. There are now 2 images under the light blue. Click on the undo arrow on the top left if you change your mind. You can also switch around any layer you want. Compare the image on top and the bottom and you will see the color changes and the new layer in the blue color.

Tip #5 – Change Score Lines to Cut Lines
Did you see all of the cute cards you can make with the Cricut Joy! Well you can make the cut corners with any of the machines. You just have to change your score line into a cut line. It’s super simple. Insert a score line using shapes on the left panel. Size it to where you want it and place it on the top left corner of the front of the card. Click on the score line, go up to the toolbar and change the Linetype from Score to cut. There you have it, your little line will now cut instead of score, repeat that process on the 4 corners.
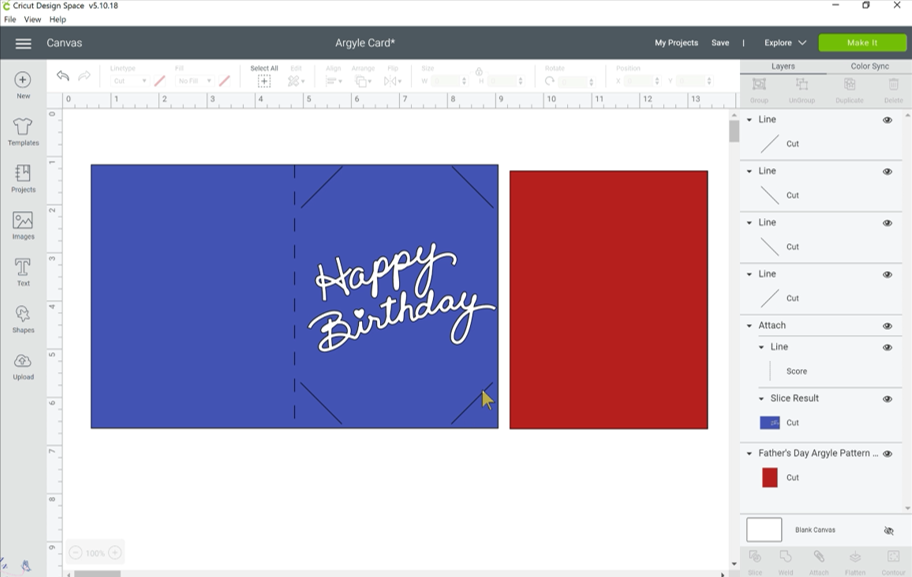
NOTE: Don’t forget to attach the 4 cut lines to your card backing so that it cuts.
Tip #6 – Adjust Layers on Side Panel
We’re halfway through our Top 10 Tips for Cricut Design Space, I hope you are finding these helpful. Make sure to comment at the bottom which is your favorite one.
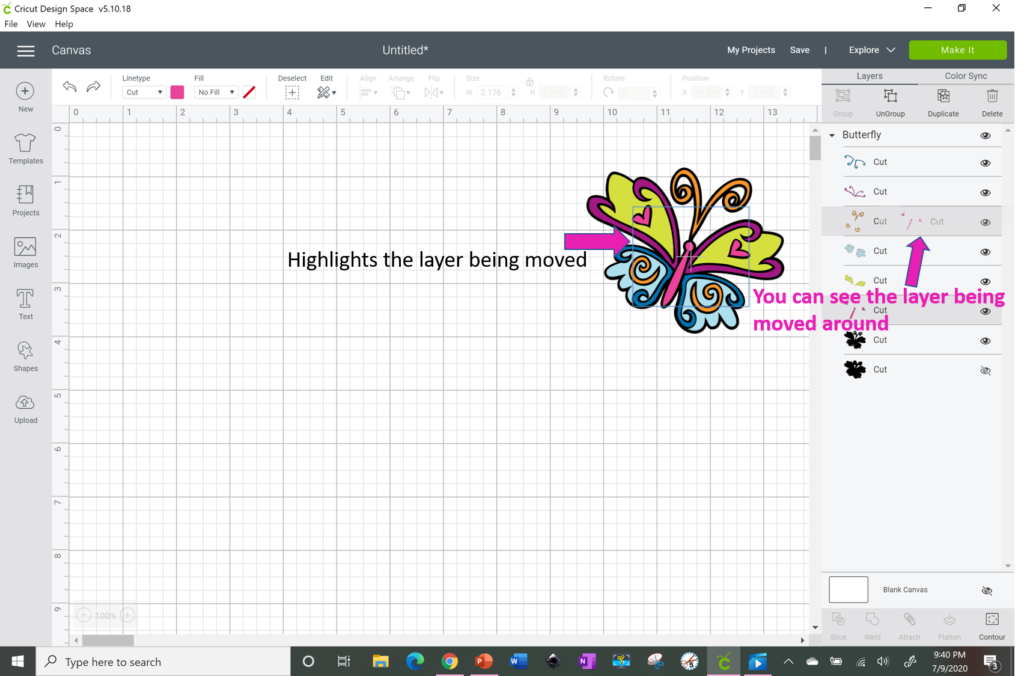
Again, we go to the handy layers panel on the right. This Top 10 Tip for Cricut Design Space is so helpful, especially when you have an image with a lot of layers that you need to keep arranging 1 or 2 layers to the front or back. This is very similar to the Color Sync process. Make sure your layers are not grouped or attached. Now select the layer you want to move and click and drag it to the position you want. This is all done on the layers panel.
You should see 2 things happen. 1. the layer you selected now has a little + sign next to it and you can move it around. 2. on the image itself a box goes around the layer you are dragging and dropping. How cool is that!!
Tip #7 – Use Shift Key to Keep Word Alignment
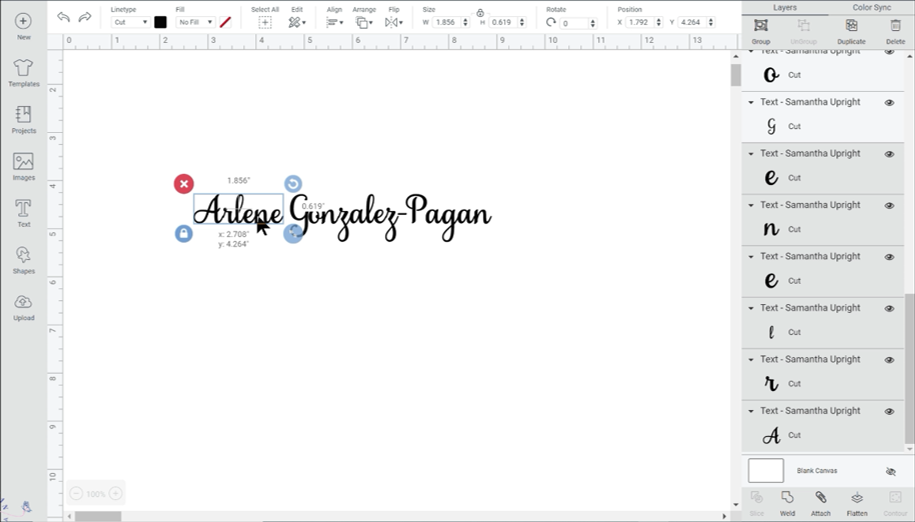
How frustrating is it when you need to align your text and have to ungroup words to move letters closer together. Of course, when you try to do it the letters move up and down or all around except straight over to where you need them. I have the answer for you. Highlight the word or letter you want to move either left or right and hold down the Shift key. It will let you move directly left or right in a straight line with no worries. You can easily move letters and words closer so much quicker and easily now. More importantly, in a straight line.
Tip #8 – Change Custom Material Settings
Ever wonder how people get their Cricuts to do 2 passes over their thicker material for cutting, or change the pressure on their machine. This Top 10 Tip on Cricut Design Space is the answer.
When you are ready to cut your design, make sure your knob on your Explorer is set to custom. The Maker automatically has you select your material. You will then go to Browse all Materials and you will see the full list of materials you can choose from. However, we can take this one step further. If you look at the bottom of the page, you will see where it says Material Settings, click on that.
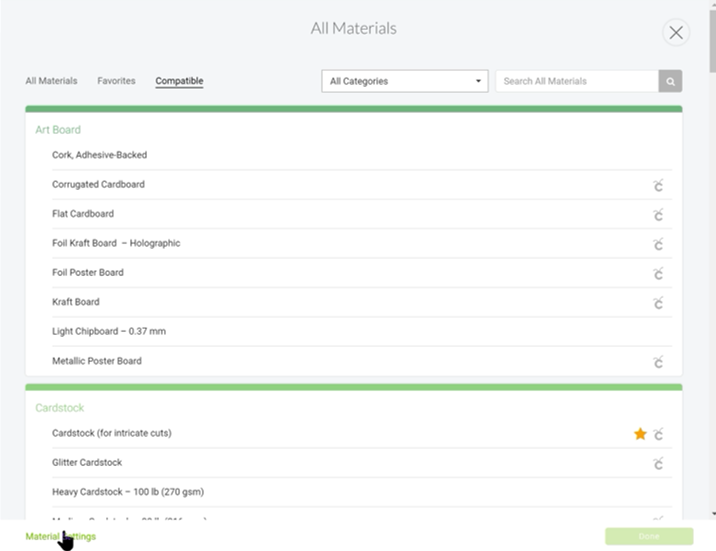
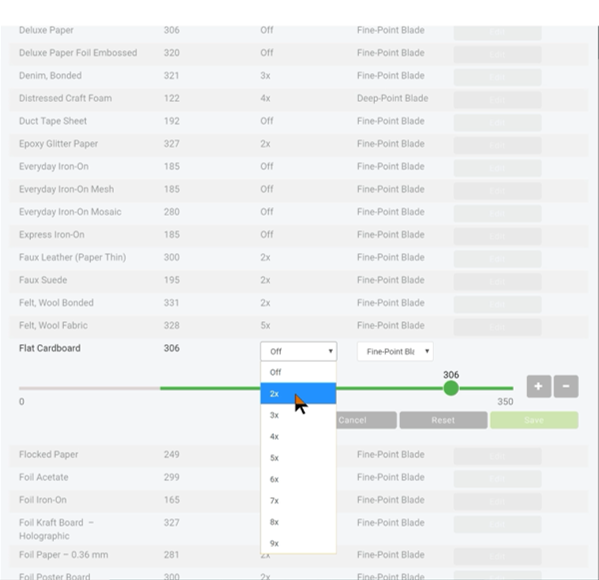
Now you see all of the materials that you can choose from BUT you also see what the default settings are for each one of them. You can see the Cut Pressure, Multi-Cut setting and Blade Type. The great thing is if you click on Edit to the right of that, you can customize it.
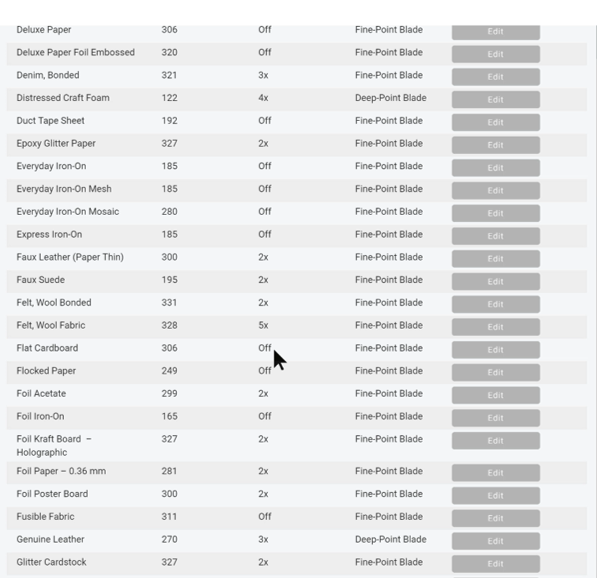
Let’s say I’m choosing Flat Cardboard as my material but I want it to cut 2x without me having to wait and then press the flashing “C” again. I would click on the edit button to the right and change the Multi-Cut setting to 2x. How great is that??
Tip # 9 – Maximize Space on Cutting Mat
Other than being able to create folders or rename files, the other thing I wish Cricut Design Space would do is optimize the space on my cutting mat to fit as many images in the same color as possible. However, since that’s not available, we do the next best thing. Move them around from one mat to the other and make them fit.
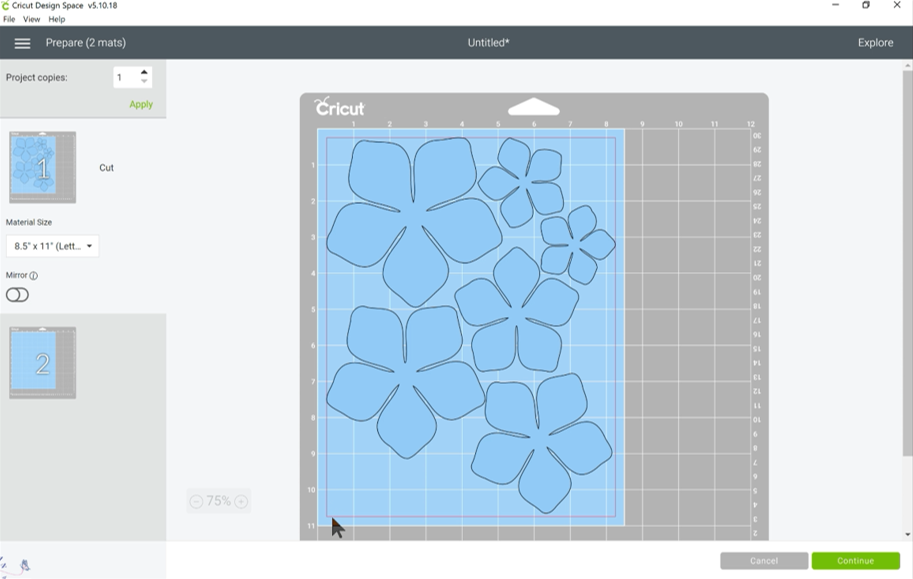
Here’s a file of my Jazmin flower, you can find it in the Resource Library. I only cut my flowers in 8 ½ x 11” paper because that’s what I have so much of. When I switch my paper size to that it tells me that it can fit all of the petals on 1 sheet except 1.
No way, I do not accept that because I see how much wasted space is left on that 1 sheet. So I start moving the petals around, rotating them and shuffling them around until I’m satisfied that I have created a space for that 1 lonely petal.
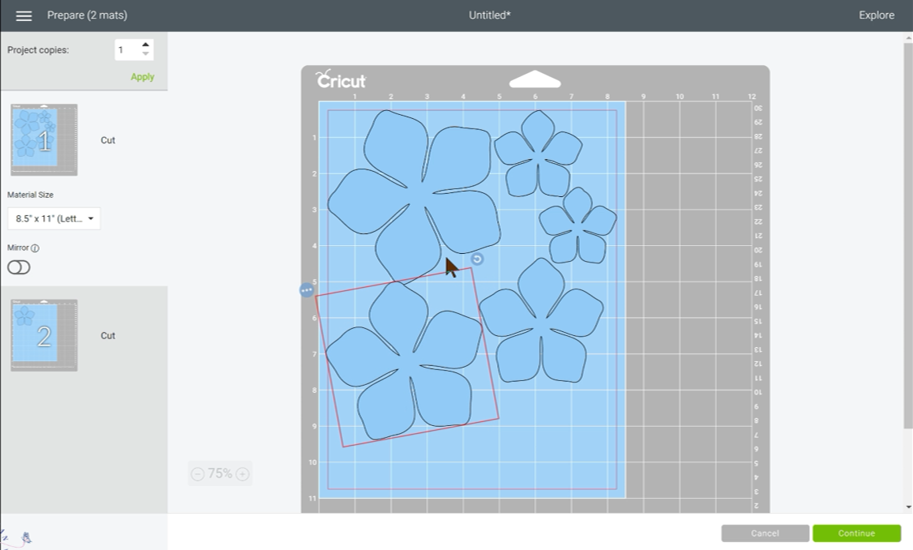
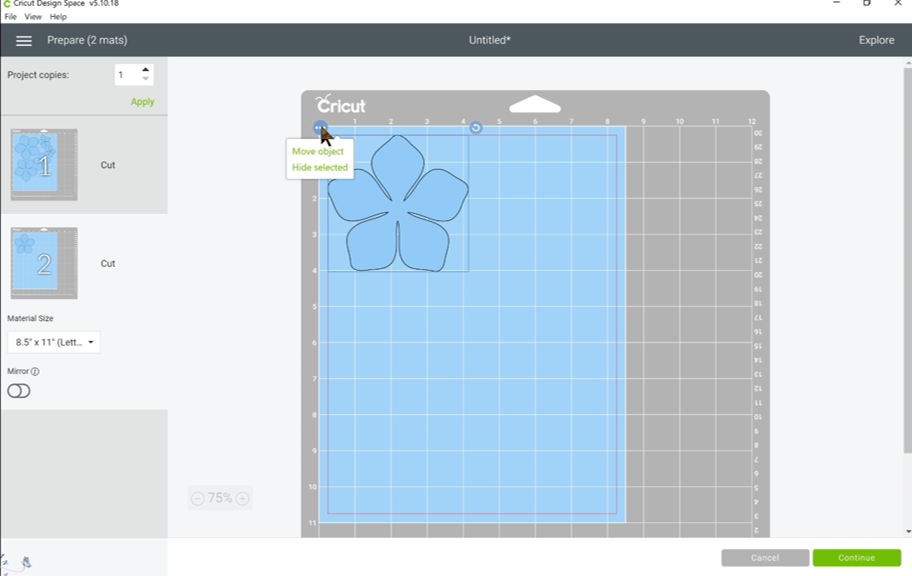
So now you go to the 1 petal and click on it, you will see 3 little dots on the upper left corner come up, click on Move Object, select which mat you want it to move to and click Confirm. That little petal is now with it’s friends and after a little moving around it fits just fine. There is no way I was letting that go without trying to make it fit. Don’t worry about the empty 2nd mat, it won’t affect your project.
Tip #10 – Duplicate Image on Cutting Mat
So, we’ve come to the last of our Top 10 Tips for Cricut Design Space. Who knew there were so many great things we could do on the cutting mat itself. This is a great tip as it saves you time and clutter on your Canvas.
Have you created images where you needed multiple copies of the same layer. For example, if you created a flower but need 5 or 6 copies of each petal or leaves to attach. Well this is where this quick tip comes in handy.
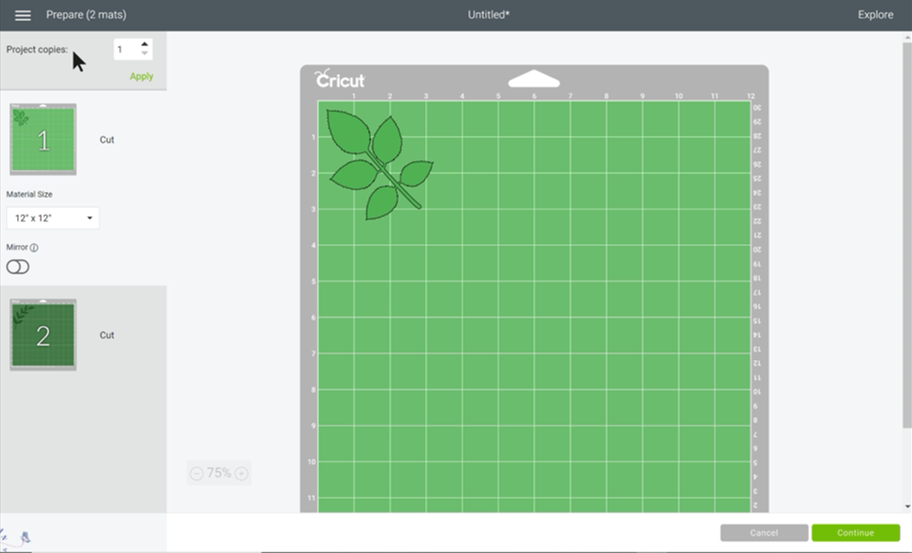
When you’re on the cutting mat, on the top left corner you will see that it says Project Copies. Not sure if you knew what that was for, but if you change the number to 2 or more, it will automatically add that many of the same images on your cutting mat. You don’t have to duplicate layer after layer on your Canvas, you just do it right before you cut so that you save time and your Canvas doesn’t get messy with so many copies of layers.
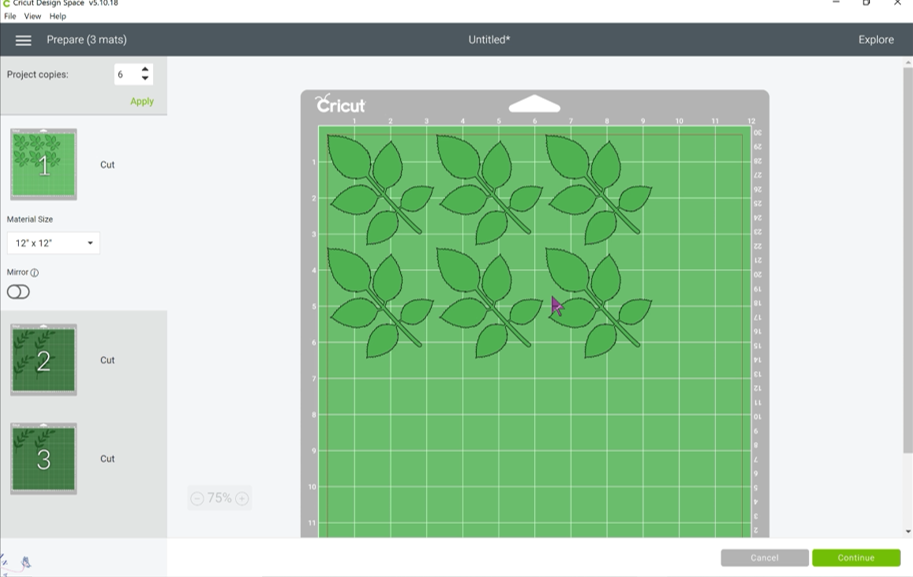
Oh I’m so happy I shared these with you. These Top 10 Tips for Cricut Design Space have saved me so much time and materials and I know they will do the same for you. Please comment below if you have other tips you would like to share with us; I definitely would love to hear them. I’m all ears for anything that saves me a minute or some $$.
Until next time, remember to always Love What You Do and Do What You Love.
