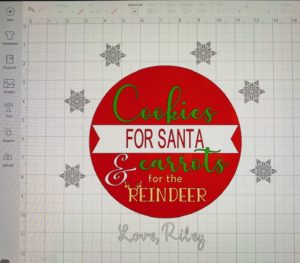
As I decorate my house this year I knew I had to make a Santa cookie plate for my new granddaughter so that she has a special gift from me. I love how it turned out and hope you make one for a special child in your life too. Here are the steps; however, I also made a tutorial video for you.
What You Will Need
Plate – it can be a charger plate or a glass plate
Vinyl in colors of your choice
Cricut Machine
Green cutting mat
Transfer Tape
Weeding tools
10 Easy Steps
1. Measure the writing area of your plate – for this charger plate I measure just the inner circle at 8”
2. Open up a new project in Design Space
3. Click on insert shape on the left side and select circle
4. Resize the circle to the size you determined and change the color to match your plate; use white for a clear plate
5. Click on insert text on the left panel and type Cookies in the font of your choice
6. Since my plate was red and I wanted Santa to be in red I decided to add a banner shape and cut out the word Santa. Tip – watch how here.
7. Click on insert text again and add the & symbol
8. Insert text and type carrots and do the same for the Reindeer
9. I decided I wanted to personalize this plate for my granddaughter and just inserted text at the bottom, Love Riley
10. To give it a little winter touch I added some snowflakes around the border of the plate. These are sized at 1 ½” each.
I hope Santa loves and enjoys it as much as I did making it.
And remember, Do What You Love, Love What You Do! Feel free to contact me with any questions.


